Sunday, December 11, 2022

Select Text


In this chapter, we will discuss how to select text in Word 2010. Selecting a text is one of the most important skills required while editing a word document. You can perform various operations on a selected text; you can delete the selected text, copy it, move it, apply formatting to it, change its capitalization, etc.

The most common method of selecting a text is to click and drag the mouse over the text you want to select. Following table lists down a few other simple methods that will help you in selecting text in different scenarios −

S.NoComponent & Selection Method
1

Selecting text between two points

Click at the start of the block of text, hold down Shift, and click at the end of the block.

2

Selecting a single word

Double-click anywhere on the word you want to select.

3

Selecting a paragraph

Triple-click anywhere on the paragraph you want to select.

4

Selecting a sentence

Hold down the Ctrl key and click anywhere in the sentence you want to select.

5

Selecting a column of text

Hold down Alt, click and hold the mouse button, and drag over the column you want to select.

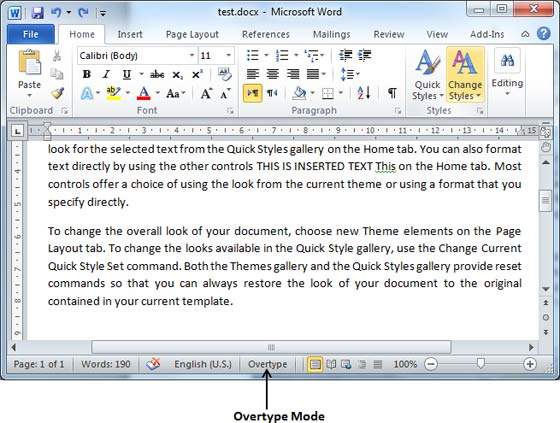
Note that only one part of the document can be in the selected state. If you have one portion of the document in selected state and as soon as you try to select any other part of the document, previous part will automatically be de-selected.

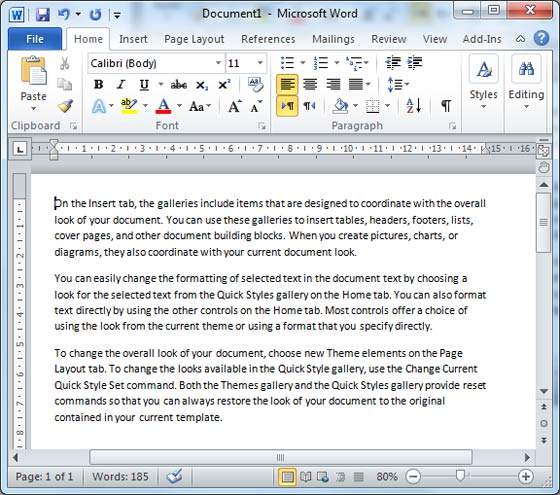
Using the Selection Bar

The black shaded area in the following screen shot is called the selection bar. When you bring your cursor in this area, it turns into a rightward-pointing arrow.

Selection Bar

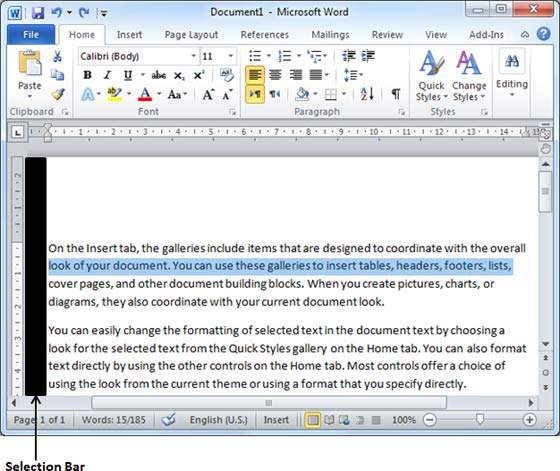
You can use the selection bar to select the various components of a document as described in the following table −

S.NoComponent & Selection Method
1

Selecting a line

Bring your mouse in the selection bar area and click in front of the line you want to select.

2

Selecting a paragraph

Bring your mouse in the selection bar area and double click in front of the paragraph you want to select.

3

Selecting the document

Bring your mouse in the selection bar area and triple-click.

Using the Keyboard

Keyboard provides very good support when you want to select various components of the document as described in the following table −

S.NoKey & Selection Method Selecting Text
1

Ctrl + A

Press Ctrl + A keys to select the entire document.

2

Shift

Keep pressing the Shift key and use any of the arrow keys to select the portion of text.

3

F8

Press F8 and then use any of the arrows keys to select the portion of text.

4

Ctrl + Shift + F8

Press Ctrl + Shift + F8 and then use any of the arrows keys to select column of the text.

Insert Text


In this chapter, we will discuss how to insert text in Word 2010. Many times it is required to go back and insert additional text in an existing line. Microsoft Word provides two ways to insert text in existing text and we will show how to use both the methods of inserting text −

Insert and Add Text

First we will see how inserted text will be added into the existing content without replacing any existing content.

Step 1 − Click the location where you wish to insert text; you can also use the keyboard arrows to locate the place where the text needs to be inserted.

Position Selection

Step 2 − Start typing the text that needs to be inserted. Word inserts the text to the left of the insertion point, moving the existing text to the right

Insert Text

Insert and Replace Text

In the Insertion mode, text will be added into the existing content but same time it will over write all the content which comes in its way.

Step 1 − Right-click the status bar and select the Overtype option from the displayed menu.

Overtype Option

When you select the Overtype option, the status bar will show the insertmode as shown below −

Insert Mode

Step 2 − Click on the Insert text available at the status bar and it will switch to the Overtype mode as shown below −

Overtype Mode

Step 3 − Now click the location where the text needs to be inserted or you can use the keyboard arrows to locate the place where the text needs to be inserted.

Position Selection

Step 4 − Start typing the text that needs to be inserted. Word will replace the existing text with the newly typed text without moving the position of the exiting test.

Insert Text

Note − Microsoft Word 2010 disabled the functionality of the Insert key and it does nothing, so you will have to follow-up with the above mentioned procedure to turn-on or turn-off the Insert mode.

Sunday, December 4, 2022

Closing a Document


In this chapter, we will understand how to close a document in Word 2010. When you finish working with a document, you will proceed to close the document. Closing a document removes it from your computer screen and if you had other documents open, Word displays the last document you used otherwise, you see a blank Word window. Here are simple steps to close an opened document −

Step 1 − Click the File tab and select the Close option.

Close Document

Step 2 − When you select the Close option and if the document is not saved before closing, it will display the following Warning box asking whether the document should be saved or not.

Save Dialogue

Step 3 − To save the changes, click Save, otherwise click Don't Save. To go back to the document, click Cancel. This will close the document and if you have other documents open, Word displays the last document you used, otherwise, you see a blank Word window as shown below −

Empty Window

Opening a Document


In this chapter, we will discuss how to open a document in Word 2010.

Opening New Document

A new, blank document always opens when you start Microsoft Word. Suppose you want to start another new document while you are working on another document, or you closed an already opened document and want to start a new document. Here are the steps to open a new document −

Step 1 − Click the File tab and select the New option.

New Document

Step 2 − When you select the New option from the first column, it will display a list of templates in the second column. Double-click on the Blank document; this is the first option in the template list. We will discuss the other templates available in the list in the following chapters.

You should have your blank document as shown below. The document is now ready for you to start typing your text.

Blank Document

You can use a shortcut to open a blank document anytime. Try using the Ctrl + N keys and you will see a new blank document similar to the one in the above screenshot.

Opening Existing Document

There may be a situation when you open an existing document and edit it partially or completely. Follow the steps given below to open an existing document −

Step 1 − Click the File tab and select the Open option.

Open Existing

Step 2 − This will display the following file Open dialog box. This lets you navigate through different folders and files, and also lets you select a file which you want to open.

Select File

Step 3 − Finally, locate and select a file which you want to open and click the small triangle available on the Open button to open the file. You will have different options to open the file, but simply use the Open option.

File Open Options

This will open your selected file. You can use the Open Read-Only option if you are willing just to read the file and you have no intention to modify, i.e., edit the file. Other options can be used for advanced usage.

Save Document


In this chapter, we will discuss how to save a document in Word 2010.

Saving New Document

Once you are done with typing in your new Word document, it is time to save your document to avoid losing work you have done on a Word document. Following are the steps to save an edited Word document −

Step 1 − Click the File tab and select the Save As option.

Save As Option

Step 2 − Select a folder where you will like to save the document, Enter the file name which you want to give to your document and Select the Save Asoption, by default it is the .docx format.

Save Option

Step 3 − Finally, click on the Save button and your document will be saved with the entered name in the selected folder.

Saving New Changes

There may be an instance when you open an existing document and edit it partially or completely, or an instance where you may like to save the changes in between editing of the document. If you want to save this document with the same name, then you can use either of the following simple options −

  • Just press the Ctrl + S keys to save the changes.

  • Optionally you can click on the floppy icon available at the top left corner and just above the File tab. This option will also help you save the changes.

  • You can also use the third method to save the changes, which is the Save option available just above the Save As option as shown in the above screenshot.

If your document is new and it was never saved so far, then with either of the three options, Word will display a dialogue box to let you select a folder, and enter the document name as explained in case of saving new document.

Move Around


In this chapter, we will discuss how to move around in Word 2010. Word provides a number of ways to move around a document using the mouse and the keyboard.

To begin with, let us create some sample text. To create a sample text, there is a short cut available. Open a new document and type =rand() and press Enter. Word will create the following content for you −

Word Sample Text

Moving with Mouse

You can easily move the insertion point by clicking in your text anywhere on the screen. There may be instances when a document is big and you cannot see a place where you want to move. Here, you will have to use the scroll bars, as shown in the following screenshot −

Word Scroll Bars

You can scroll through your document by rolling your mouse wheel, which is equivalent to clicking the up-arrow or down-arrow buttons in the scroll bar.

Moving with Scroll Bars

As shown in the above screenshot, there are two scroll bars: one for moving vertically within the document, and one for moving horizontally. Using the vertical scroll bar, you may −

  • Move upward by one line by clicking the upward-pointing scroll arrow.

  • Move downward by one line by clicking the downward-pointing scroll arrow.

  • Move one next page, using the next page button (footnote).

  • Move one previous page, using the previous page button (footnote).

  • Use the Browse Object button to move through the document, going from one chosen object to the next.

Moving with Keyboard

The following keyboard commands, used for moving around your document, also move the insertion point −

KeystrokeWhere the Insertion Point Moves
Forward ArrowForward one character
Backword ArrowBack one character
Upward ArrowUp one line
Downard ArrowDown one line
PageUpTo the previous screen
PageDownTo the next screen
HomeTo the beginning of the current line
EndTo the end of the current line

You can move word by word or paragraph by paragraph. You would have to hold down the Ctrl key while pressing an arrow key, which moves the insertion point as described here −

Key CombinationWhere the Insertion Point Moves
Ctrl +Forward ArrowTo the next word
Ctrl +Backword ArrowTo the previous word
Ctrl +Upward ArrowTo the start of the previous paragraph
Ctrl +Downard ArrowTo the start of the next paragraph
Ctrl + PageUpTo the previous browse object
Ctrl + PageDownTo the next browse object
Ctrl + HomeTo the beginning of the document
Ctrl + EndTo the end of the document
Shift + F5To the last place you changed in your document.

Moving with Go To Command

Press the F5 key to use the Go To command. This will display a dialogue box where you will have various options to reach to a particular page.

Normally, we use the page number, the line number or the section number to go directly to a particular page and finally press the Go To button.

Word Go To Command

Entering Text


In this chapter, let us discuss how to enter text with Microsoft Word 2010. Let us see how easy it is to enter text in a Word document. We assume you know that when you start Word, it displays a new document by default as shown below −

Enter Text

Document area is the area where you type your text. The flashing vertical bar is called the insertion point and it represents the location where the text will appear when you type. keep the cursor at the text insertion point and start typing the text. We typed only two words "Hello Word" as shown below. The text appears to the left of the insertion point as you type −

Hello Word

The following are the two important points that will help you while typing −

  • You do not need to press Enter to start a new line. As the insertion point reaches the end of the line, Word automatically starts a new one. You will need to press Enter, to add a new paragraph.

  • When you want to add more than one space between words, use the Tab key instead of the spacebar. This way you can properly align text by using the proportional fonts.

Data Link Layer

In the OSI model, the data link layer is a 4 th  layer from the top and 2 nd  layer from the bottom. The communication channel t...