Wednesday, February 15, 2023

Printing Documents


In this chapter, we will discuss how to print documents in Word 2010. Consider you are done with previewing and proofing your document and ready for the final printing. This chapter will teach you how to print a part or a complete Microsoft Word document.

Printing Documents

The following steps will help you print your Microsoft Word document.

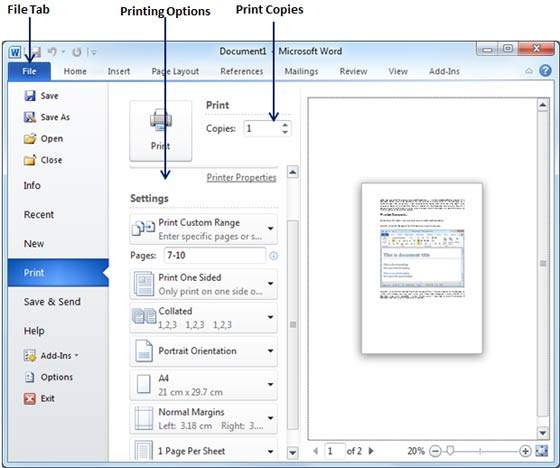
Step 1 − Open the document for which you want to see the preview. Next click the File tab followed by the Print option which will display a preview of the document in the right column. You can scroll up or scroll down your document to walk through the document using given Scrollbar. The middle column gives various options to be set before you send your document to the printer.

Print Preview

Step 2 − You can set various other printing options available. Select from among the following options, depending on your preferences.
Print Options

S.NoOption and Description
1

Copies

Set the number of copies to be printed; by default, you will have one copy of the document.

2

Print Custom Range

This option will be used to print a particular page of the document. Type the number in Pages option, if you want to print all the pages from 7 till 10 then you would have to specify this option as 7-10 and Word will print only 7th, 8th, 9th and 10th pages.

3

Print One Sided

By default, you print one side of the page. There is one more option where you will turn up your page manually in case you want to print your page on both sides of the page.

4

Collated

By default, multiple copies will print Collated; if you are printing multiple copies and you want the copies uncollated, select the Uncollated option.

5

Orientation

By default, page orientation is set to Portrait; if you are printing your document in landscape mode then select the Landscape mode.

6

A4

By default, the page size is A4, but you can select other page sizes available in the dropdown list.

7

Custom Margin

Click the Custom Margins dropdown list to choose the document margins you want to use. For instance, if you want to print fewer pages, you can create narrower margins; to print with more white space, create wider margins.

8

1 Page Per Sheet

By default, the number of pages per sheet is 1 but you can print multiple pages on a single sheet. Select any option you like from the given dropdown list by clicking over the 1 Page Per Sheet option.

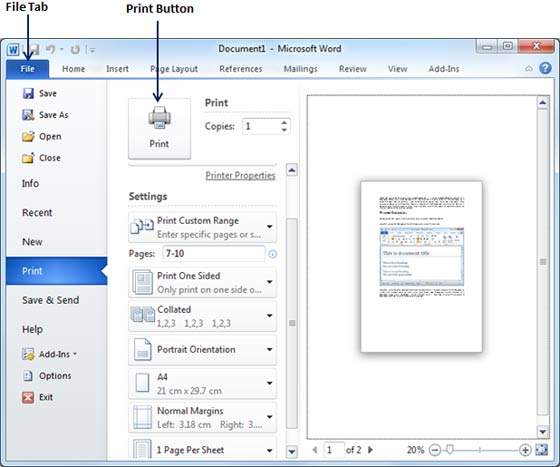
Step 3 − Once you are done with your setting, click on the Print button which will send your document to the printer for final printing.
Print Button

Tuesday, February 14, 2023

Preview Documents


In this chapter, we will discuss the preview of documents in Word 2010. When you are ready for printing your Word document, it is always recommended to preview the document before you send the document for final printing. During preview of the document you might discover that the set margin is not appropriate or many items may not look good after printing so better to fix them after having a preview of the document. You can also have the option to specify which pages to print, select a printer, specify the paper size on which you want to print, and set the other printing options.
Preview Documents

The following steps will help you preview your Microsoft Word Document.

Step 1 − Open the document the preview of which you want to see.

Heading Levels

Step 2 − Click the File tab followed by the Print option; this will display a preview of the document in the right column. You can scroll up or scroll down your document to walk through the document using the given Scrollbar. In the next chapter, we will learn how to print the previewed document and how to set different printing options.

Print Preview

Step 3 − Once you are done with your preview, you can click the Home tabto go to the actual content of the document.

Monday, February 13, 2023

Table of Contents


In this chapter, we will discuss how to create table of contents in Word 2010. A table of contents (or TOC) is a list of headings in the order in which they appear in the document. You can set a list of headings which should be a part of the table of contents. Let us learn how to create a Table of Contents. A table of content helps in navigating through a Word document by providing associated page numbers and direct links to various headings available on those pages.

Create Table of Contents

The following will help you to create Table of Contents in your Microsoft Word using various levels of headings.

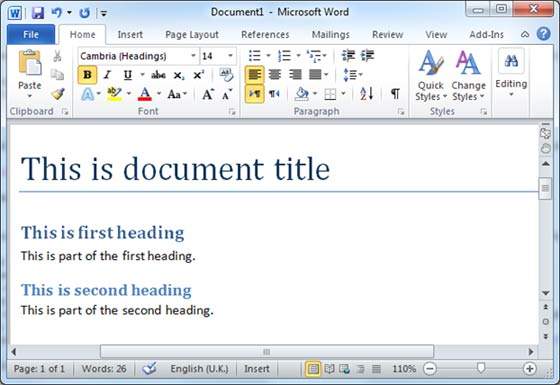
Step 1 − Consider a document having different levels of headings.

Heading Levels

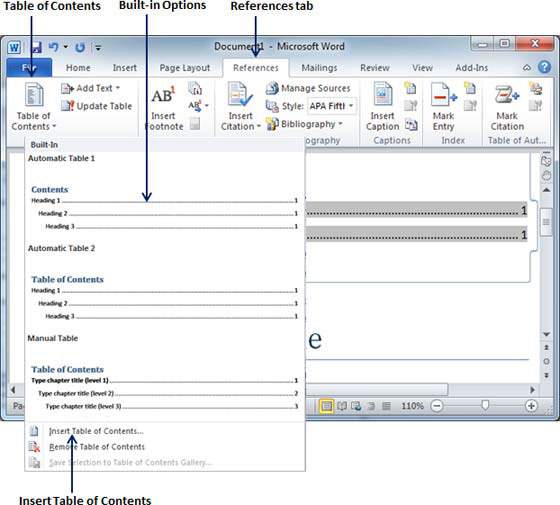
Step 2 − You can insert a table of content anywhere in the document, but the best place is always at the beginning of the document. So bring your insertion point at the beginning of the document and then click the References tabfollowed by the Table of Content button; this will display a list of Table of Contents options.

ToC Options

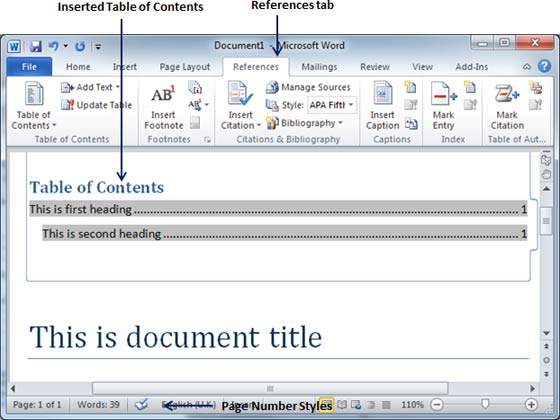
Step 3 − Select any of the displayed options by simply clicking on it. A table of content will be inserted at the selected location.

Table of Content

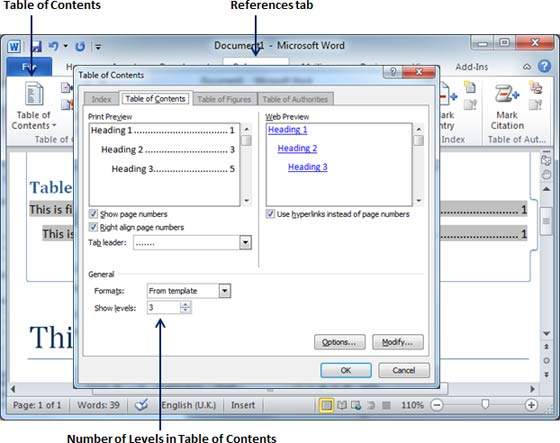
Step 4 − You can select number of levels of headings in your table of content. If you click on the Insert Table of Content option available in the option menu, then it will show you a dialog box where you can select the number of levels you want to have in your table of content. You can turn ON or turn OFF the Show Page Numbers option. Once done, click the OK button to apply the options.

Levels in TOC

Now if you press the Ctrl key and then click over the any link available in the table of content, it will take you directly to the associated page.

Update Table of Contents

When you work on a Word document, then number of pages and their content keep varying and accordingly you need to update your Table of Contents. Following are the simple steps to update an existing Table of Contents in your Microsoft Word.

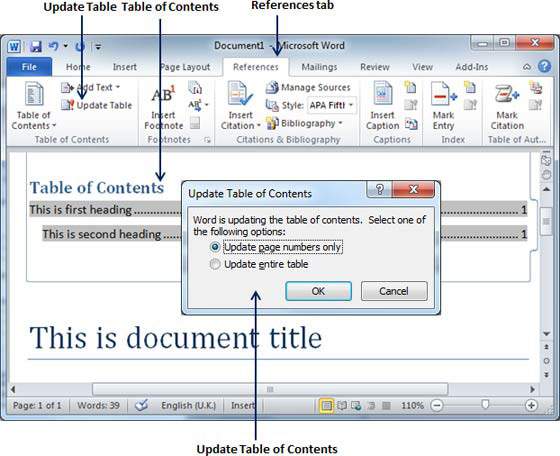
Step 1 − Consider you already have a table of content as shown above. Click the References tab followed by the Update Table button; this will display the Update Table of Contents dialog box with two options.

Update Table of Contents

Step 2 − If you want to update just the page numbers then select the first option Update page numbers only available in the dialog box but if you want to update page numbers as well, then select the second option Update entire table and you will find your table of content updated with all the latest changes.

Delete Table of Contents

The following steps will help you delete an existing Table of Contents from Microsoft Word.

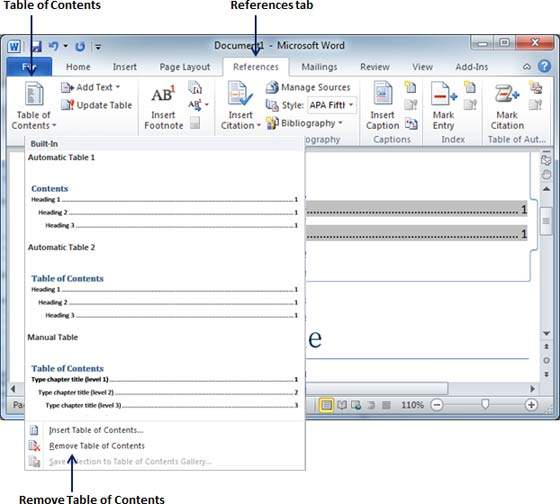
Step 1 − Consider you already have a table of content as shown above. Click the References tab and next Table of Contents button which will display a list of Table of Contents options along with Remove Table of Contentsoption available at the bottom.

Remove Table of Contents

Step 2 − Click over the Remove Table of Contents option to delete the existing table of contents.

Thursday, February 9, 2023

Auto Formatting


In this chapter, we will discuss auto formatting in Word 2010. The AutoFormat feature automatically formats a document as you type it by applying the associated styles to text. Let us learn how to use the auto format option available in Microsoft Word 2010 to format the typed content. For example, if you type three dashes --- and press enter, Word will automatically create a line for you. Similarly, Word will automatically format two dashes - into an em dash (—).

Setting AutoFormat

The following steps will help you set the AutoFormat feature in your Microsoft Word.

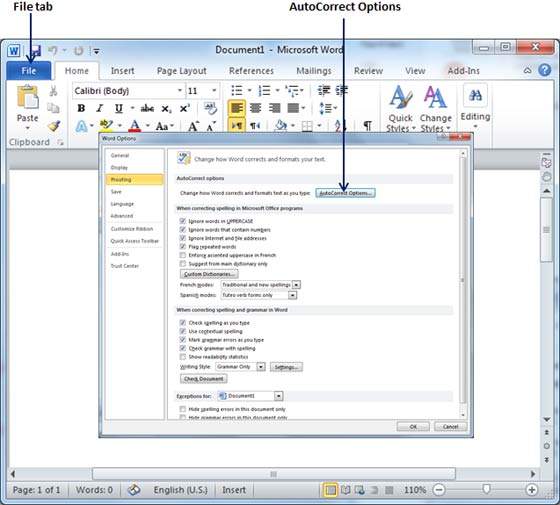
Step 1 − Click the File tab, click Options, and then click the Proofing option available in the left most column, it will display the Word Options dialog box.

Word Options

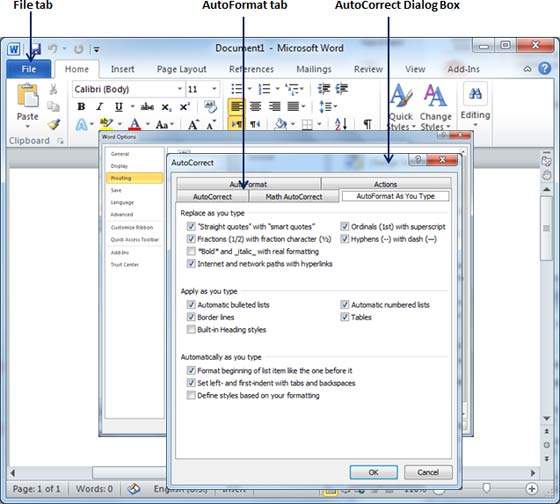
Step 2 − Click the AutoCrrect Options button; this will display the AutoCorrect dialog box and then click the AutoFormat As You Type tab to determine what items Word will automatically format for you as you type.

AutoCorrect Options

Step 3 − Select from among the following options, depending on your preferences.

S.NoOption and Description
1

"Straight quotes" with “smart quotes”

This option will be used to replace the plain quotation characters with curly quotation characters.

2

Fractions (1/2) with fraction character (½)

This option will be used to replace the fractions typed with numbers and slashes with fraction characters.

3

*Bold* and _italic_ with real formatting

This option will be used to format text enclosed within asterisks (*) as bold and text enclosed within underscores ( _ ) as italic.

4

Internet and network paths with hyperlinks

This option will be used to format e-mail addresses and URLs as clickable hyperlink fields.

5

Ordinals (1st) with superscript

This option will be used to format ordinal numbers with a superscript like 1st becomes 1st.

6

Hyphens (--) with dash (—)

This option will be used to replace a single hyphen with an en dash (.) and two hyphens with an em dash (—).

7

Automatic bulleted lists

This option will be used to apply bulleted list formatting to paragraphs beginning with *, o, or - followed by a space or tab character.

8

Automatic numbered lists

This option will be used to apply numbered list formatting to paragraphs beginning with a number or letter followed by a space or a tab character.

9

Border lines

This option will be used to apply paragraph border styles when you type three or more hyphens, underscores, or equal signs (=).

10

Tables

This option will be used to create a table when you type a series of hyphens with plus signs to indicate the column edges. Try with +-----+------+ ) and then press Enter.

11

Built-in heading styles

This option will be used to apply heading styles to heading text.

12

Format beginning of list item like the one before it

This option will be used to replace plain quotation characters with curly quotation characters.

13

Set left- and first-indent with tabs and backspaces

This option sets left indentation on the tab ruler based on the tabs and backspaces you type.

14

Define styles based on your formatting

This option automatically creates or modifies styles based on manual formatting that you apply to your document.

Step 4 − Finally click OK to close the AutoCorrect Options dialog box and again click OK to close the Word Options dialog box.

Wednesday, February 8, 2023

Auto Correction


In this chapter, we will discuss auto correction in Word 2010. The AutoCorrect feature automatically corrects common typographical errors when you make them. Let us learn how to use the auto correction option available in Microsoft Word 2010 to correct the spelling automatically as you type the words in your documents.

Setting AutoCorrect

The following steps will help to enable the AutoCorrect feature in Microsoft Word.

Step 1 − Click the File tab, click Options, and then click the Proofing option available in the left most column, it will display the Word Options dialog box.

Word Options

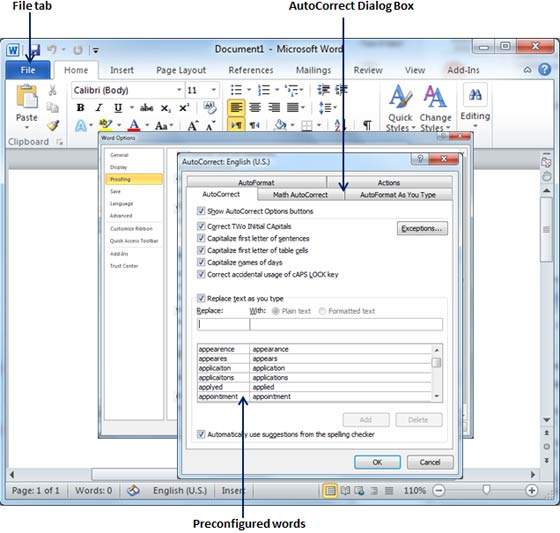
Step 2 − Click the AutoCorrect Options button which will display the AutoCorrect dialog box and then click the AutoCorrect tab. Now you have to make sure all the options are enabled, especially the Replace Text as you type option. It is also recommended to be careful when you turn off an option.

AutoCorrect Options

Step 3 − Select from among the following options, depending on your preferences.

S.NoOption and Description
1

Show AutoCorrect Options Buttons

This option will be used to display a small blue button or bar beneath text that was automatically corrected. Click this button to see a menu, where you can undo the correction or set AutoCorrect options.

2

Correct TWo INitial CApitals

This option changes the second letter in a pair of capital letters to lowercase.

3

Capitalize first letter of sentences

This option capitalizes the first letter following the end of a sentence.

4

Capitalize first letter of table cells

This option will be used to capitalize the first letter of a word in a table cell.

5

Capitalize names of days

This option will be used to capitalize the names of the days of the week.

6

Correct accidental usage of cAPS LOCK key

This option will be used to correct capitalization errors that occur when you type with the CAPS LOCK key depressed and turns off this key.

7

Replace text as you type

This option replaces typographical errors with the correct words as shown in the list beneath it.

8

Automatically use suggestions from the spelling checker

This option tells Word to replace spelling errors with words from the dictionary as you type.

Although Word comes preconfigured with hundreds of AutoCorrect entries, you can also manually add entries using the following dialog box and use the Replace and With text boxes to add more entries. I added an entry for Markiting which should be replaced with Marketing. You can use the Addbutton to add multiple entries.

Step 4 − Click OK to close the AutoCorrect Options dialog box and again click OK to close the Word Options dialog box. Now try to type Markitingand as soon as you type this word, Microsoft Word autocorrects it with the correct word Marketing word.

Use Graphics


In this chapter, we will discuss how to use graphics in Word 2010. You can add beauty to your Microsoft Word documents by inserting a variety of graphics. This chapter will teach you two ways of adding graphics.

Adding Picture in Document

The following steps will help you add an existing picture in your word document. It is assumed that you already have a picture available on your machine before you add this picture in your Word document.

Step 1 − Click on your document where you want to add a picture.

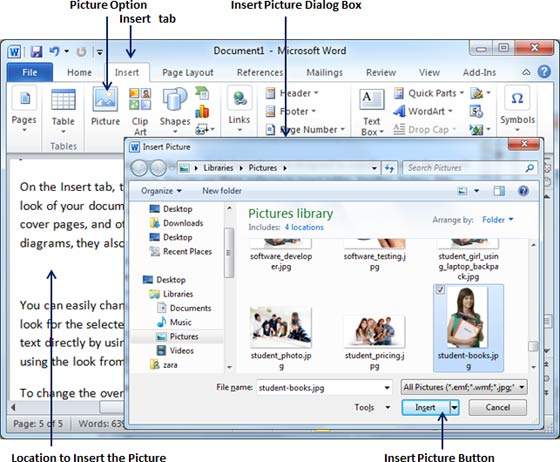
Step 2 − Click the Insert tab and then click the Picture option available in illustrations group, which will display the Insert Picture dialog box.

Insert Picture

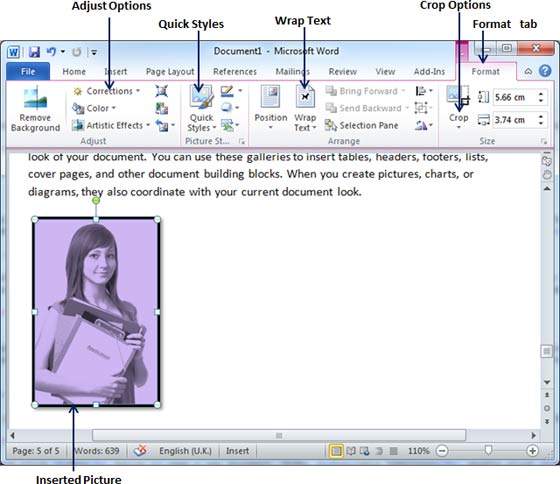
Step 3 − You can select a required picture using the Insert Picture dialog box. When you will click the Insert button, selected picture will be inserted in your document. You can play with your inserted picture in different ways, like you can apply quick styles to your picture, you can resize it, or you can change its color too. To try it, just -lick your inserted image and Word will give you numerous options available under the Format tab to format your inserted graphics.

Format Picture

You can try yourself to insert other available graphics like Clipart, Different Shapes, Charts and SmartArt or Screenshots.

Adding WordArt in Document

WordArt provides a way to add fancy words in your Word document. You can document your text in a variety of ways. The following steps will help you add WordArt in your document.

Step 1 − Click in your document where you want to add WordArt.

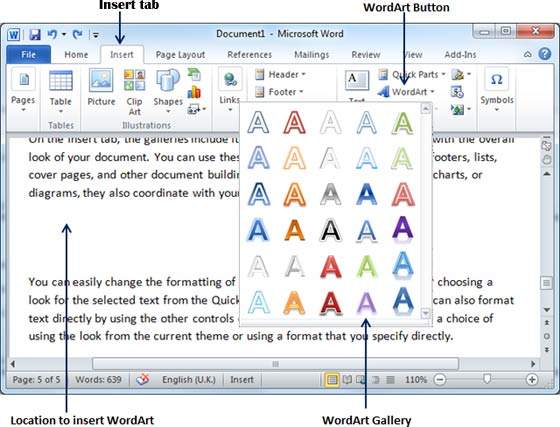
Step 2 − Click the Insert tab and then click the WordArt option available in the Text group; this will display a gallery of WordArt.

Insert WordArt

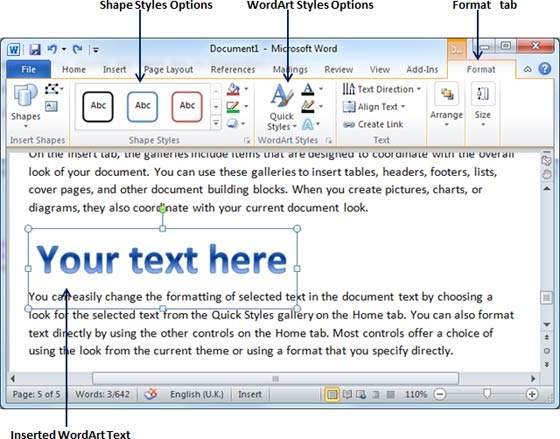
Step 3 − You can select any of the WordArt style from the displayed gallery by clicking on it. Now you can modify the inserted text as per your requirement and you can make it further beautiful by using different options available. To try it, just double-click your inserted WordArt and Word will give you numerous options available from the Format tab to format your image. Most frequently used options are Shape Styles and WordArt Styles.

Format WordArt

You can try yourself to apply different options on the inserted WordArt by changing its shape styles, colors, WordArt Styles, etc.

Monday, February 6, 2023

Use Templates


In this chapter, we will discuss how to use templates in Word 2010. Microsoft Word template is a collection of styles which defines paragraph styles for regular text paragraphs, a title, and different levels of headings. You can use any of the already existing templates for your Word document or you can design a template which can be used for all your company documents.

Using Existing Template

We will now understand how to use an already existing template for your newly created word document. A template is selected at the time when you create a new blank document.

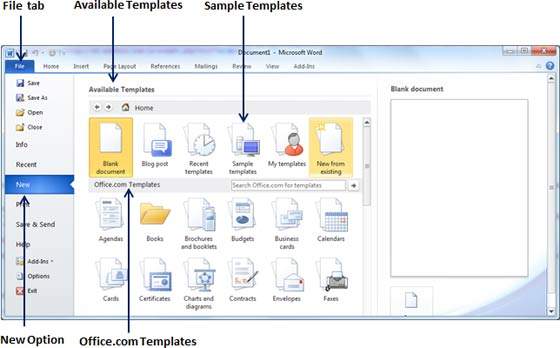
Step 1 − To start a new document, click the File tab and then click the Newoption; this will display the Available Templates.

Available Templates

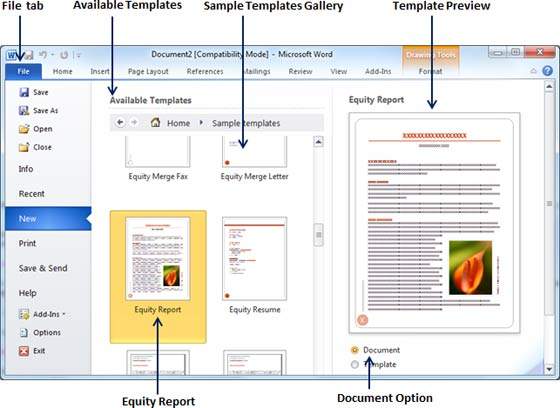
Step 2 − Microsoft Word provides a list of templates arranged under Sample Templates or you can download hundreds of templates from office.comwhich are arranged in different categories. We will use Sample Templates for our document. For this, we need to click over Sample Templates; this will display a gallery of templates. You can try using the office.com option to select a template based on your requirement.

Sample Templates

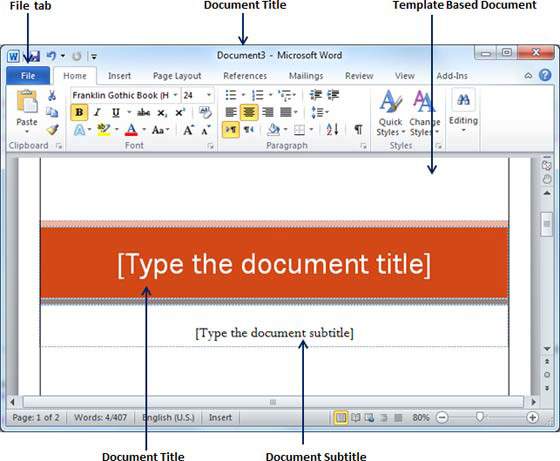
Step 3 − You can browse a list of available templates and finally select one of them for your document by double-clicking over the template. We will select Equity Report template for our report requirement. While selecting a template for your document, you should select the Document Optionavailable in the third column. This opens your document with predefined setting with which you can modify document title, author name, heading, etc. based on your document requirement.

Selected Template

Create New Template

You can create a fresh new template based on your requirement or you can modify an existing template and save it for later use as a template. A Microsoft Word template file has an extension of .dotx. The following steps will help you create a new template.

Step 1 − To create a new template using an existing template, click the Filetab and then click the New option; this will display the Available Templatesto be selected. Select any of the available template and open it with the Template Option turned on.

Template Option

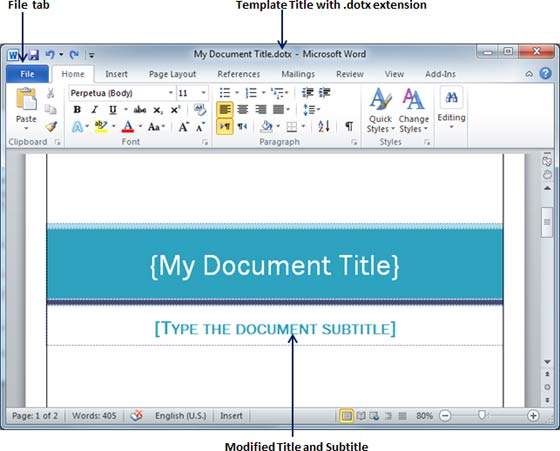
Step 2 − You can now modify an open template as per your requirements and once you are done, you can save this template with a .dotx extension which is a standard extension for Microsoft Word Templates.

Modified Template

You can create a template from a new document as well. Click the File button, and click New option to open a new document. Under Available Templates, double click Blank Document to create a new document template. Save the template with a unique name and .dotx extension.

You can save the created template anywhere you click and whenever you like to use this template, just double-click over the template file and it will open a new template based document for you.

What is computer security?

Computer security basically is the protection of computer systems and information from harm, theft, and unauthorized use. It is the process ...