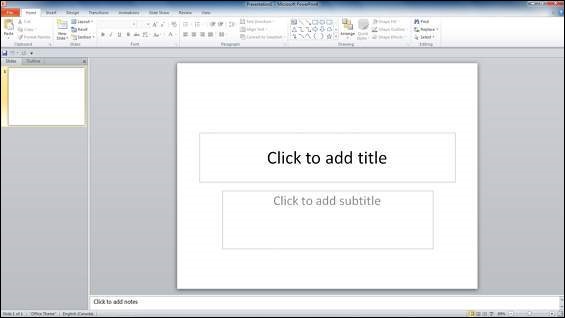
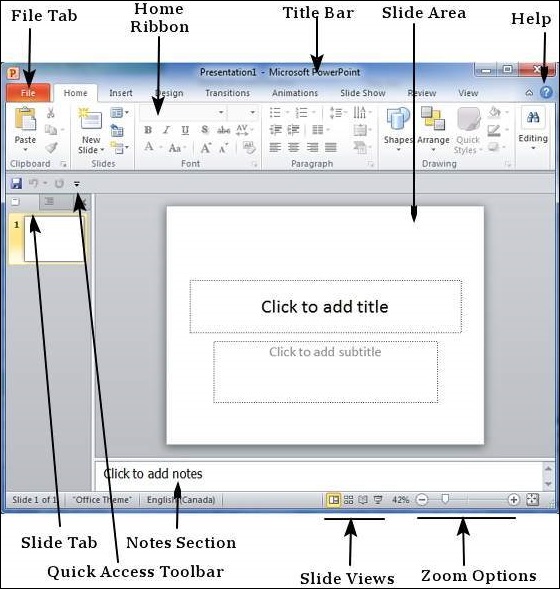
Friday, February 24, 2023

Explore Windows


The following screenshot shows the various areas in a standard PowerPoint file. It is important to familiarize yourself with these areas as it makes learning and using PowerPoint easier.

Explore PowerPoint

File Tab

This tab opens the Backstage view which basically allows you to manage the file and settings in PowerPoint. You can save presentations, open existing ones and create new presentations based on blank or predefined templates. The other file related operations can also be executed from this view.

Ribbon

PowerPoint Ribbon

The ribbon contains three components −

  • Tabs − They appear across the top of the Ribbon and contain groups of related commands. HomeInsertPage Layout are examples of ribbon tabs.

  • Groups − They organize related commands; each group name appears below the group on the Ribbon. For example, a group of commands related to fonts or a group of commands related to alignment, etc.

  • Commands − Commands appear within each group as mentioned above.

Title Bar

This is the top section of the window. It shows the name of the file followed by the name of the program which in this case is Microsoft PowerPoint.

Slide Area

This is the area where the actual slide is created and edited. You can add, edit and delete text, images, shapes and multimedia in this section.
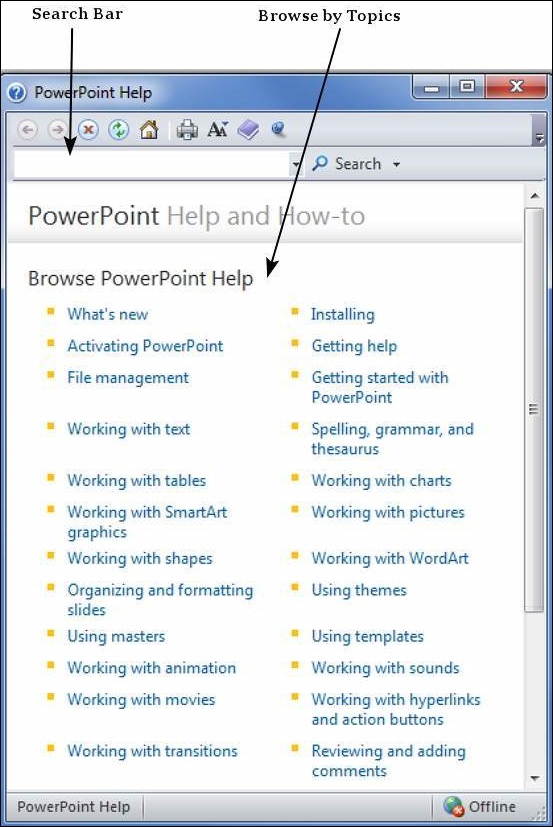
Help

The Help Icon can be used to get PowerPoint related help anytime you need. Clicking on the "?" opens the PowerPoint Help window where you have a list of common topics to browse from. You can also search for specific topics from the search bar at the top.

PowerPoint Help

Zoom Options

The zoom control lets you zoom in for a closer look at your text. The zoom control consists of a slider that you can slide left or right to zoom in or out, you can click on the - and + buttons to increase or decrease the zoom factor. The maximum zoom supported by PowerPoint is 400% and the 100% is indicated by the mark in the middle.

Slide Views

The group of four buttons located to the left of the Zoom control, near the bottom of the screen, lets you switch between PowerPoint views.

  • Normal Layout view − This displays page in normal view with the slide on the right and a list of thumbnails to the left. This view allows you to edit individual slides and also rearrange them.

  • Slide Sorter view − This displays all the slides as a matrix. This view only allows you to rearrange the slides but not edit the contents of each slide.

  • Reading View − This view is like a slideshow with access to the Windows task bar in case you need to switch windows. However, like the slideshow you cannot edit anything in this view.

Notes Section

This sections allows you to add notes for the presentation. These notes will not be displayed on the screen during the presentation; these are just quick reference for the presenter.

Quick Access Toolbar

The Quick Access Toolbar is located just under the ribbon. This toolbar offers a convenient place to group the most commonly used commands in PowerPoint. You can customize this toolbar to suit your needs.

Slide Tab

This section is available only in the Normal view. It displays all the slides in sequence. You can adddelete and reorder slides from this section.

Thursday, February 23, 2023

Getting Started with Powerpoint


In this chapter, we will understand how to get started with PowerPoint 2010. We will understand how to start PowerPoint 2010 application in simple steps. To access PowerPoint 2010, you must have Microsoft Office 2010 installed in your PC. Only Office 2010 Home and Student, Home and Business, Standard, Professional and Professional Plus packages have PowerPoint included in them. Other packages may have a viewer, but you cannot create presentations with them.

Step 1 − Click the Start button.

Windows Start Button

Step 2 − Click All Programs option from the menu.

Windows All Programs

Step 3 − Search for Microsoft Office from the sub menu and click it.

Microsoft Office 2010

Step 4 − Search for Microsoft PowerPoint 2010 from the submenu and click it.

Microsoft Office 2010

This will launch the Microsoft PowerPoint 2010 application and you will see the following presentation window.

Microsoft Office 2010

Wednesday, February 22, 2023

Set Watermark


In this chapter, we will discuss how to set watermark in a Word document. A watermark is a picture that shows up faintly behind the text on a Word document page. When you draft a document, you can watermark the document with Draft Copy stamp, or you can watermark a duplicate document with the Duplicate stamp. Microsoft Word allows you to stamp with watermark using simple steps explained in this chapter.

Set Standard Watermark

The following steps will help you set standard watermark in word document. A standard watermark is the one which is already defined by words and cannot modify their font or color etc.

Step 1 − Open a word document in which you want to add a watermark.

Step 2 − Click the Page Layout tab and then click the Watermark button to display a list of standard watermark options.

Standard Watermark

Step 3 − You can select any of the available standard watermarks by simply clicking over it. This will be applied to all the pages of the word. Assume we select the Confidential watermark.

Confidential Watermark

Set Custom Watermark

The following steps will help you set custom watermark in word document. A custom watermark is the one which can be modified text and its font, color and size etc.

Step 1 − Open a Word document in which you want to add a watermark.

Step 2 − Click the Page Layout tab and then click the Watermark button to display a list of standard watermark options. At the bottom, you will find the Custom Watermark option.

Standard Watermark

Step 3 − Click over the Custom Watermark option; this will display the Printed Watermark dialog box.

Printed Watermark

Step 4 − Now you can set a picture as watermark or you can set predefined text as watermark; you can also type your text in the Text box available at Printed Watermark dialog box. We will set text watermark as DUPLICATEand also set its font color and font size. Once all the parameters are set, click the OK button to set the parameters.

Printed Watermark Result

Remove Watermark

The following steps will help you remove an existing watermark from a Word document.

Step 1 − Open a Word document the watermark of which needs to be deleted.

Step 2 − Click the Page Layout tab followed by the Watermark button to display a list of standard watermark options. At the bottom, you will find the Remove Watermark option.

Remove Watermark

Step 3 − Click Remove Watermark option; this will delete the existing watermark from the document.

Tuesday, February 21, 2023

Document Security


Microsoft Word provides a high level of security for your word generated documents. You can set a password for a document to stop unauthorized reading and editing of the document or if you want someone just to read the document then you can set editing restriction on your word document. This chapter will teach you how to make your document password protected and restricted from editing and formatting.

Set Document Password

Once you set a password for a document then you will be able to open the document only if you know the password. If you forget your password, then there is no way to recover it and to open the document. So you need to be careful while setting a password for your important document.

The following steps will help you set a password for a Word document.

Step 1 − Open a Word document for which you want to set a password.

Step 2 − Click the File tab and then click the Info option and finally the Protect Document button which will display a list of options to be selected.

Protect Document

Step 3 − Select the Encrypt with Password option simply by clicking over it. This will display an Encrypt Document dialog box asking for a password to encrypt the document. The same dialog box will appear twice to enter the same password. After entering password each time, click the OK button.

Encrypt Document

Step 4 − Save the changes, and finally you will have your document password protected. Next time when someone tries to open this document, it will ask for the password before displaying the document content, which confirms that now your document is password protected and you need password to open the document.

Password Dialog

Remove Document Password

You can remove a document password only after opening it successfully. The following steps will help you remove password protection from your Word document.

Step 1 − Open a Word document the password of which needs to be removed. You will need the correct password to open the document.

Step 2 − Click the File tab followed by the Info option and finally the Protect Document button which will display a list of options to be selected.

Protect Document

Step 3 − Select the Encrypt with Password option simply by clicking over it. This will display an Encrypt Document dialog box and password which will be in a dotted pattern. You need to remove this dotted pattern from the box and make it clear to remove the password from the document.

Clear Password Dialog

Now when you will open your document next time, Word will not ask you for any password because you have removed the password protection from the document.

Set Editing & Formatting Restrictions

The following steps will help you set editing restrictions in a Word document.

Step 1 − Open a Word document for which you want to set editing restrictions.

Step 2 − Click the File tab and then click the Info option and finally the Protect Document button which will display a list of options to be selected.

Protect Document

Step 3 − Select the Restrict Editing option simply by clicking over it. This will open the actual document and it will also give you the option to set editing restrictions in the Restrict Formatting and Editing area. Here you can set formatting as well as editing restrictions on the document.

Restrict Editing

Step 4 − One you are done with your setting, click the Yes, Start Enforcing Protection button which will display a Start Enforcing Protection dialog box asking for password so that no one else can change the setting. You can enter the password or you can leave it simply blank which means there is no password setting for this protection.

Password Dialog

Step 5 − Finally click the OK button and you will find that your document is editing (or formatting if you applied) protected.

Remove Editing & Formatting Restrictions

You can remove the editing restriction from your document using these simple steps.

Step 1 − Open a Word document for which you want to remove the editing restriction.

Step 2 − Click the File tab and then click the Info option and finally the Protect Document button; this will display a list of options to be selected.

Protect Document

Step 3 − Select the Restrict Editing option simply by clicking over it. This will display the Restrict Formatting and Editing area as follows.

Stop Protection

Step 4 − Now click the Stop Protection button. If you had set up a password at the time of setting the editing or formatting restrictions, then you will need the same password to remove the editing or formatting restrictions. Word will now ask for the same using the Unprotect Document Dialog box , otherwise it will simply remove the restrictions.

Unprotect Document

Monday, February 20, 2023

Compare Documents


In this chapter, we will discuss how to compare documents in Word 2010. Sometime you modify a Microsoft Word document without turning on the Track Changes mode; in such cases, tracking the changes becomes difficult and you will have to compare the original document with the modified document word by word. But you do not need to compare it manually, Microsoft Word provides an option to compare two documents very easily. Let us see how it can be done.

Compare Two Documents

Let us have the following two documents, (a) Original document (b) Modified version of the same document as follows

Original Document

Original Document

Modified Document

Modified Document

The following steps will help you compare the two documents.

Step 1 − Click the Review tab and then click the Compare button. This will display the two options to be selected.

Compare Option

Step 2 − Select the Compare option simply by clicking over it. This will display a Compare Documents dialog box asking for the two versions of the Word document that need to be compared with each other.

Compare Documents

Step 3 − Select the Original Document and the Revised Document and click the OK button to display the differences in two documents. Left column on the screen would show all the changes done over the course of changes and you will see original as well as modified version of the document on the same screen. You can walk through these changes using the Previous & Nextbutton available under the Review tab.

Documents Comparison

NOTE − While comparing two documents you can use the different settings available at the Compare Documents dialog box under the More button.

Friday, February 17, 2023

Translate Word


In this chapter, we will discuss how to translate a Word 2010 document. Microsoft Word has an option to translate a complete Word document from one language to another language using simple step. Let us learn how we can translate document content from English to some other language (Spanish).

Translate Document Using Microsoft Translator

The following steps will help you translate a document from one language to another language.

Step 1 − Click the Review tab and then click the Translate button; this will display different options to be selected.

Translate Document

Step 2 − Select the Choose Translation Language option simply by clicking over it. This will display a Translation Language Options dialog box asking for selecting from and to languages. Here From is the source document's language and To is the target document’s language.

Translation Language Options

Step 3 − After selecting From Language and To Language, click OK. Now again go to Review tab and then click Translate button which will display different options to be selected. Select top option Translate Documentoption from the given options, this will display Translate Whole Documentdialog box asking for your permission to send your document over the internet to be translated by Microsoft Translator.

Translate Whole Document

Step 4 − To translate your document, you can click the Send button. This will send your document over the internet to be translated and you will have your document translated in your target language.

Translated Document

Step 5 − Now you can copy your translated content manually in any other document and save it for final use.

Thursday, February 16, 2023

Email Documents


In this chapter, we will discuss how to email documents using Word 2010. Microsoft Word can be used to send a Word document in an email as an attachment directly at the given email address without opening your email program. This chapter will teach you simple ways of sending email in a variety of formats, including a Word document file (DOC) attachment or a PDF, among others.

Mailing Documents

Following are the simple steps to send a word document as an attachment at the given email address.

Step 1 − Open the document you want to send using e-mail as an attachment.

Step 2 − Click the File tab and then click the Save & Send option from the left most column; this will display a number of options to Save & Send, you will have to select the Send using Email option available in the middle column.

Send Email Options

Step 3 − The third column will have various options to send email which allows you to send your document as an attachment in DOC format or you can send your Word document in a PDF format. Click a method to send the document. I'm going to send my document in PDF format.

When you click the Send as PDF option, it displays the following screen where you can type the email address to which you want to send your document, email subject and other additional messages as well. To send email to multiple recipients, separate each e-mail address with a semicolon (;) and a space.

Data Link Layer

In the OSI model, the data link layer is a 4 th  layer from the top and 2 nd  layer from the bottom. The communication channel t...