Monday, January 9, 2023

Apply Formatting


In this chapter, we will discuss how to copy and apply formatting in Word 2010. If you already have a well formatted portion of text and you want to apply similar formatting to another portion of text, then Microsoft Word provides a feature to copy and apply a format from one portion of text to another portion of text. This is very useful and a time saving operation.

Copy and Apply of text formatting works for various text attributes; for example, text fonts, text colors, margins, headings, etc.

Copy and Apply Text Formatting

The following steps will help you understand how to copy and apply text formatting from one portion of text in your document to another portion of text in your document.

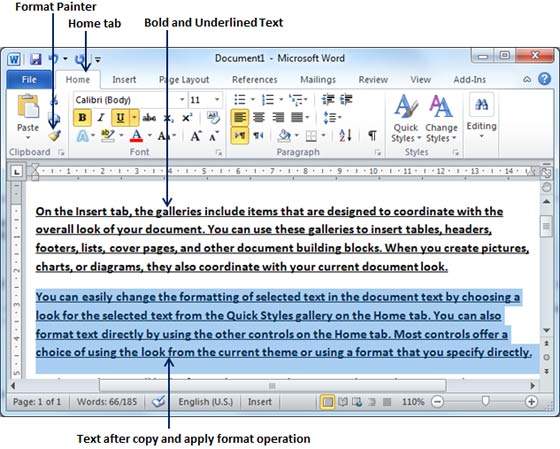
Step 1 − Select the portion of text containing the formatting that you want to copy. I have selected a text which has bold and underlined font as shown below.

Formatted Text

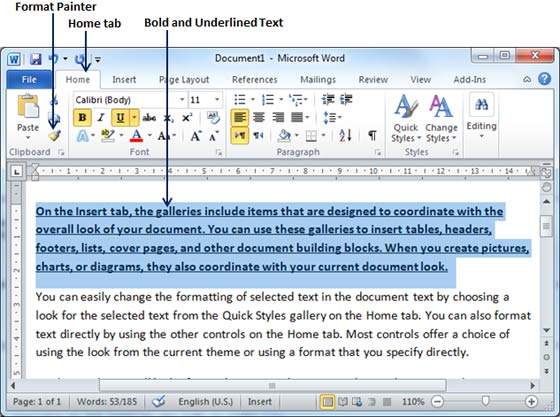
Step 2 − click the Home tab and click the Format Painter button to copy the format of the selected text. As soon as you click the format painter button, the mouse pointer changes to a paint brush when you move the mouse over your document.

Step 3 − Now you are ready to apply the copied text format to any of the selected text. So select a text using mouse where you want to apply the copied text format. While selecting a portion of text, you have to make sure that your mouse pointer is still in paint brush shape. After selecting the text, just release the right-click button of the mouse and you will see that newly selected text is changed to the format used for the original selection. You can click anywhere outside the selection to continue working on your document for further editing.

Copy Format Text

Copy and Apply Text Formatting multiple times

Step 1 − If you are intended to apply formatting at multiple places, then you will have to double-click the Format Painter button while copying the text format. Later on, you just keep selecting the text where you want to apply the text formatting.

Step 2 − When you are done with applying formatting at all the places, click Format Painter to come out of the format applying operation.

Set Tabs


In this chapter, we will discuss how to set tabs in Word 2010. Microsoft Word tabs help in setting up information properly within a column. Word enables you to set left, center, right, decimal, or bar tabs to line up columnar information. By default, Word places tabs every .5 inch across the page between the left and right margins.

S.NoTab & Description
1

Left

Left-aligns text at tab stop and this is the default tab.

2

Center

Centers text over tab stop.

3

Right

Right-aligns text at tab stop.

4

Decimal

Aligns numbers at decimal point over tab stop.

5

Bar

Creates a bar to separate the text.

Setting a Tab

Following are the simple steps to set the center and the right tabs in a Word document. You can use similar steps but different tabs to set up decimal and bar tabs.

Step 1 − Type some text that you want to line up with the tab stops. Press the Tab key only once between each column of information you to want to line up. I typed the following three lines.

Tab Button

Step 2 − Select a tab type using the Tab button; assume the center tab and finally select the paragraph or paragraphs the tabs of which you want to set. Next click the ruler where you want the tab to appear, a tab will appear at the ruler where you just clicked and the selected portion of text will be adjusted in the center.

Ruler Tab

Step 3 − Now select the right tab using the Tab Button and click the ruler at the right side where you want to align the text at the right side. A right tab will appear at the ruler where you just clicked and the selected portion of text will be right-aligned.

Set Tab

Moving a Tab

You can move an already set tab at a particular location by following the steps given below.

Step 1 − Click just before the line for which you want to change the tab setting. Drag the tab sign available at the ruler to the left or right.

Move Tab

Step 2 − A vertical line marks its position as you drag and when you click and drag a tab, the text moves with the tab.

Moved Tab

Thursday, January 5, 2023

Borders and Shades


In this chapter, we will discuss how to work on borders and shades in Word 2010. Microsoft Word allows you to place a border on any or all of the four sides of selected text, paragraphs, and pages. You can also add different shades to the space occupied by the selected text, paragraphs, and pages. This chapter will teach you how to add any of the borders (left, right, top or bottom) around a text or paragraph or a page and how to add different shadows to them.

Add Borders to Text

Following are the simple steps to add border to any text or paragraph.

Step 1 − Select the portion of text or paragraph to which you want to add border. You can use any of the text selection method to select the paragraph(s).

Step 2 − Click the Border Button to display a list of options to put a border around the selected text or paragraph. You can select any of the option available by simply clicking over it.

Text Border

Step 3 − Try to add different borders like left, right top or bottom by selecting different options from the border options.

Text Border2

Step 4 − To delete the existing border, simply select the No Border option from the border options.

Note − You can add a horizontal line by selecting the Horizontal Line option from the border options. Otherwise type --- (three hyphens) and press ENTER. A single, light horizontal line will be created between the left and the right margins.

Add Borders to Page

You can add borders of your choice to word pages by following the steps given below.

Step 1 − Click the Border Button to display a list of options to put a border. Select the Border and Shading option available at the bottom of the list of options as shown in the above screenshot. This will display a Border and Shading dialog box. This dialog box can be used to set borders and shading around a selected text or page borders.

Borders and Shading

Step 2 − Click the Page Border tab which will display a list of border settings, styles and options whether this border should be applied to the whole document or just one page or the first page.

Step 3 − You can use the Preview section to disable or enable left, right, top or bottom borders of the page. Follow the instruction given in the preview section itself.

Step 4 − You can customize your border by setting its color, width by using different art available under the style section.

Stylish Page Border

You can have similar or even better borders as given below.

Page Border

Add Shades to Text

The following steps will help you understand how to add shades on a selected portion of text or a paragraph(s).

Step 1 − Click the Border Button to display a list of options to put a border. Select the Border and Shading option available at the bottom of the list of options as shown in the above screenshot. This will display a Border and Shading dialog box. This dialog box can be used to set borders and shading around a selected portion of text or page borders.

Text Shading

Step 2 − Click the Shading tab; this tab will display the options to select fill, color and style and whether this border should be applied to a paragraph or a portion of text.

Step 3 − You can use the Preview section to have an idea about the expected result. Once you are done, click the OK button to apply the result.

Text Shades

Set Line Spacing


In this chapter, let us discuss how to set line spacing in Word 2010. A line spacing is the distance between two lines in a Microsoft Word document. You can increase or decrease this distance as per your requirement by following a few simple steps. This chapter will explain how to set the distance between two lines as well as how to set the distance between two paragraphs.

Spacing between Lines

Following are the simple steps to adjust spacing between two lines of the document.

Step 1 − Select the paragraph or paragraphs for which you want to define spacing. You can use any of the text selection method to select the paragraph(s).

Step 2 − Click the Line and Paragraph Spacing Button triangle to display a list of options to adjust space between the lines. You can select any of the option available by simply clicking over it.

Line Spacing

Spacing between Paragraphs

You can also set distance between two paragraphs. Following are the simple steps to set this distance.

Step 1 − Select the paragraph or paragraphs for which you want to define spacing and click the Paragraph Dialog Box launcher available on the Home tab.

Step 2 − Click the Before spinner to increase or decrease the space before the selected paragraph. Similar way, click the After spinner to increase or decrease the space after the selected paragraph. Finally, click the OK button to apply the changes.

Paragraph Spacing

You can use the Line Spacing option available at the dialog box to set line spacing as we have seen in previous example. You can try it yourself.

Wednesday, January 4, 2023

Create Bullets


Microsoft word provides bullets and numbers to put a list of items in a nice order. This chapter will teach you simple steps to create either the bulleted or the numbered lists in simple steps.

Create a List from Existing Text

This is very simple to convert a list of lines into a bulleted or numbered list. Following are the simple steps to create either bulleted list or numbered list.

Step 1 − Select a list of text to which you want to assign bullets or numbers. You can use any of the text selection method to select the portion of text.

Step 2 − Click the Bullet Button triangle to display a list of bullets you want to assign to the list. You can select any of the bullet style available by simply clicking over it.

Bullet List

Step 3 − If you are willing to create a list with numbers, then click the Numbering Button triangle instead of the bullet button to display a list of numbers you want to assign to the list. You can select any of the numbering style available by simply clicking over it.

Numbering List

Create a List as You Type

You can create a bulleted list as you type. Word will automatically format it according to your text. Following are the simple steps to create bulleted list as you type.

Step 1 − Type *, and then either press the SPACEBAR or press the TAB key, and then type the rest of what you want in the first item of the bulleted list.

Step 2 − When you are done with typing, press Enter to add the item in the list automatically and go to add next item in the list.

Step 3 − Repeat Step 2 for each list item.

Bullet List2

You can create a numbered list as you type. Word will automatically format it according to your text. Following are the simple steps to create numbered list as you type.

Step 1 − Type 1, and then either press the SPACEBAR or press the TAB key, and then type the rest of what you want in the first item of the numbered list.

Step 2 − When you are done with typing, press Enter to add the item in the list automatically and go to add next item in the list.

Step 3 − Repeat Step 2 for each list item.

Numbering List2

You can create sub-lists. These sub-lists are called multi-lists. It is simple to create sublists; press the Tab key to put items in sub-list. You can try it yourself.

Tuesday, January 3, 2023

Indent Paragraphs


In this chapter, we will discuss the how to indent paragraphs in Word 2010. As you know the margin settings determine the blank space that appears on each side of a paragraph. You can indent paragraphs in your document from the left margin, the right margin, or both the margins. This chapter will teach you how to indent your paragraphs with or without the first line of the paragraphs.

Left Indentation

Left indentation means to move the left edge of the paragraph inward towards the center of the paragraph. Let us use the following steps to create left indentation.

Step 1 − Click anywhere on the paragraph you want to indent left and click the Increase Indent button available on the Home tab or simply press the Ctrl + M keys. You can click multiple times to create deeper indentation.

Left Indentation

Step 2 − You can remove left indentation by clicking the Decrease Indentbutton available on Home tab or simply press Ctrl + Shift+ M keys. You can click multiple times to remove deeper indentation.

You can also use the Paragraph Dialog Box to set left and right indentations. We will see this dialog box in the last section of this chapter.

Right Indentation

Right indentation means to move the right edge of the paragraph inward towards the center of the paragraph. Let us use the following steps to create right indentation.

Step 1 − Click anywhere on the paragraph you want to indent and then click on the Increase Right Indent spinner available on the Page Layout tab. You can click on the spinner multiple times to create deeper indentation. You can use the Left Indent spinners as well to set left indentation from the same place.

Right Indentation

Step 2 − You can remove right indentation by clicking the Decrease Right Indent spinner in the opposite direction.

You can also use the Paragraph Dialog Box to set the left and the right indentations. We will see this dialog box in the next section.

First Line Indentation

You can move the left side of the first line of a paragraph inward toward the center. Let us see the procedure to perform first line indentation.

Step 1 − Click anywhere on the paragraph you want to indent right and click the Paragraph Dialog Box launcher available on the Home tab.

Step 2 − Click the Before Text spinner to set left indentation and select the First Line Option to move the left side of the first line of a paragraph inward toward the center. You can control the movement by setting the Indentation Unit. A preview box will give only the idea and not the indentation status.

First Line Indentation

Hanging Indentation

You can move the left side of the first line of a paragraph leftward, away from the center which is called the hanging indentation. Let us see the procedure to perform hanging indentation.

Step 1 − Click anywhere on the paragraph you want to indent right and click the Paragraph Dialog Box launcher available on the Home tab.

Step 2 − Click the Before Text spinner to set left indentation and select Hanging Option to move the left side of the first line of a paragraph leftward, away from the center. You can control the movement by setting the Indentation Unit. A preview box will give only the idea and not the indentation status.

Hanging Indentation

You can use the After Text spinner to set the right indentation. You can try it yourself.

Monday, January 2, 2023

Text Alignments


In this chapter, we will discuss text alignments in Word 2010. There are four types of paragraph alignment available in Microsoft Word — left-aligned, center-aligned, rightaligned, and justified.

Left-Aligned Text

A paragraph's text is left aligned when it is aligned evenly along the left margin. Here is a simple procedure to make a paragraph text left-aligned.

Step 1 − Click anywhere on the paragraph you want to align and click the Align Text Left button available on the Home tab or simply press the Ctrl + L keys.

Left Alignment

Center Aligned Text

A paragraph's text will be said center aligned if it is in the center of the left and right margins. Here is a simple procedure to make a paragraph text center aligned.

Step 1 − Click anywhere on the paragraph you want to align and click the Center button available on the Home tab or simply press the Ctrl + E keys.

Center Alignment

Right-Aligned Text

A paragraph's text is right-aligned when it is aligned evenly along the right margin. Here is a simple procedure to make a paragraph text right-aligned.

Step 1 − Click anywhere on the paragraph you want to align and click the Align Text Right button available on the Home tab or simply press the Ctrl + R keys.

Right Alignment

Justified Text

A paragraph's text is justified when it is aligned evenly along both the left and the right margins. Following is a simple procedure to make a paragraph text justified.

Step 1 − Click anywhere on the paragraph you want to align and click the Justify button available on the Home tab or simply press the Ctrl + J keys.

Justify Alignment

When you click the Justify button, it displays four options, justify, justify low, justify high and justify medium. You need to select only the justify option. The difference between these options is that low justify creates little space between two words, medium creates a more space than low justify and high creates maximum space between two words to justify the text.

Editing Microsoft Word document

Open the file that you want to edit. Choose from the following tasks:   Task Steps Edit text Click the Edit tab. Select the text...