Wednesday, January 18, 2023

Page Orientation


In this chapter, we will discuss page orientation in Word 2010. Page Orientation is useful when you print your pages. By default, Microsoft Word shows a page in portrait orientation and in this case the width of the page is less than the height of the page; the page will be 8.5 inches × 11 inches.

You can change the page orientation from portrait to landscape orientation. In such case, the width of the page will be more than the height of the page and page will be 11 inches × 8.5 inches.

Change Page Orientation

The following steps will help you understand how to change the page orientation of a word document.

Step 1 − Open the Word document the orientation of which needs to be changed. By default, orientation will be Portrait Orientation as shown below.

Page Orientation

Step 2 − Click the Page Layout tab, and click the Orientation button available in the Page Setup group. This will display an Option Menu having both the options (Portrait & Landscape) to be selected.

Oirnetation Menu

Step 3 − Click any of the options you want to set to orientation. Because our page is already in portrait orientation, we will click the Landscape option to change my orientation to landscape orientation.

Landscape Oirnetation

Cover Pages


In this chapter, we will discuss Almost all the good documents and books have an attractive first page that includes the document title, its subject, author and publisher name etc. This first page is is the Cover Page and Microsoft Word provides an easy way to add a cover page.

Add Cover Pages

Following are the simple steps to add a cover page in a Word document.

Step 1 − Click the Insert tab, and click the Cover Page button available in the Pages group. This will display a list of Built-in Cover Pages as shown below.

Bultin Cover Pages

Step 2 − Choose a cover page from the options available in the gallery. The selected cover page will be added as the first page of your document which can later be modified according to the requirements. If you want to place the cover page elsewhere except the first page, right-click the cover page in the gallery and select the location you want from the menu that appears.

Cover Page

Delete Cover Pages

The following steps will help you understand how to delete an existing cover page from a Word document.

Step 1 − Click the Insert tab, and click the Cover Page button available in the Pages group. This will display a list of Built-in Cover Pages as shown below. You will find a Remove Current Cover Page option available at the bottom of the cover page gallery.

Remove Cover Pages

Step 2 − Click the Remove Current Cover Page option and your cover page will be deleted from your document.

Tuesday, January 17, 2023

Insert Blank Pages


In this chapter, let us discuss how to insert blank pages in Word 2010. A blank page is a page which does not have any text or any other content over it. This chapter will also make you understand how to delete a blank page from your Microsoft Word document.

Insert Blank Pages

Following are the simple steps to insert blank page in a word document.

Step 1 − Bring your insertion point immediately before the text where you want to insert a blank page.

Step 2 − Click the Insert tab, and click the Blank Page button available in the Pages group.

Blank Page

Word inserts a new blank page and moves all the text after the page break onto a new page.

Blank Page

Delete Blank Pages

The following steps will help you delete blank page from a Word document.

Step 1 − Click the Home tab, and click the Show/Hide ¶ paragraph marks button available in the Paragraph group or simply press the Ctrl + Shift + *keys. This will display all the page breaks as shown below −

Blank Page

Step 2 − Bring your cursor immediately before the Page Break mark available on the blank page and press the Delete Key. This will delete the blank page and again you can click the Show/Hide ¶ paragraph marks button to hide all the paragraph marks.

Monday, January 16, 2023

Insert Page Breaks


In this chapter, we will discuss how to

insert page breaks in Word 2010. Microsoft Word automatically starts a new page when the current page fills with text but you can insert a page break to force Word to start text on a new page. You can insert a page break using either the mouse or the keyboard.

Insert Page Breaks

The following steps will help you insert page breaks in a Word document.

Step 1 − Bring your insertion point immediately before the text that has to appear on a new page.

Step 2 − Click the Insert tab, and click the Page Break button available in the Pages group.

Page Break

Word inserts a page break and moves all text after the page break onto a new page. You can also use the Ctrl + Enter keys to create a page break at the pointed location.

Page Break

Delete a Page Break

Just put the insertion point on the previous page of the page break that needs to be deleted. Press the Delete key multiple times until both the pages get merged.

Thursday, January 12, 2023

Add Page Numbers


In this chapter, we will discuss how to add page numbers in Word 2010. Microsoft Word automatically assigns page numbers on the pages of your document. Typically, page numbers are printed either in header or footer but you have the option that can display the page number in the left or right margins at the top or the bottom of a page.

Add Page Numbers

Following are the simple steps to add page numbers in a Word document.

Step 1 − Click the Insert tab, and click the Page Number button available in the header and footer section. This will display a list of options to display the page number at the top, bottom, current position etc.

Page Number

Step 2 − When you move your mouse pointer over the available options, it displays further styles of page numbers to be displayed. For example, when I take the mouse pointer at the Bottom of Page option it displays the following list of styles.

Page Number Styles

Step 3 − Finally, select any one of the page number styles. I selected the Accent Bar 1 style by clicking over it. You will be directed to the Page Footer modification mode. Click the Close Header and Footer button to come out of the Footer Edit mode.

You can format your page numbers using the Format Page Numbers option available under the listed options.

Inserted Page Number

Remove Page Numbers

The following steps will help you remove page numbering from a Word document.

Step 1 − Click the Insert tab, and click the Page Number button available in the header and footer section. This will display a list of options to display page number at the top, bottom, current position, etc. At the bottom, you will have the Remove Page Numbers option. Just click this option and it will delete all the page numbers set in your document.

Remove Page Numbers

Wednesday, January 11, 2023

Header and Footer


In this chapter, we will discuss how to add header and footer in Word 2010. Headers and footers are parts of a document that contain special information such as page numbers and the total number of pages, the document title, company logo, any photo, etc. The header appears at the top of every page, and the footer appears at the bottom of every page.

Add Header and Footer

The following steps will help you understand how to add header and footer in a Word document.

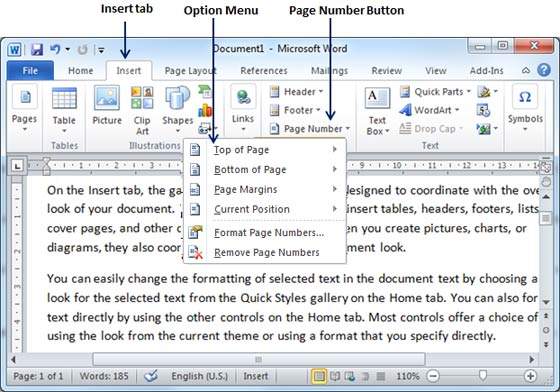
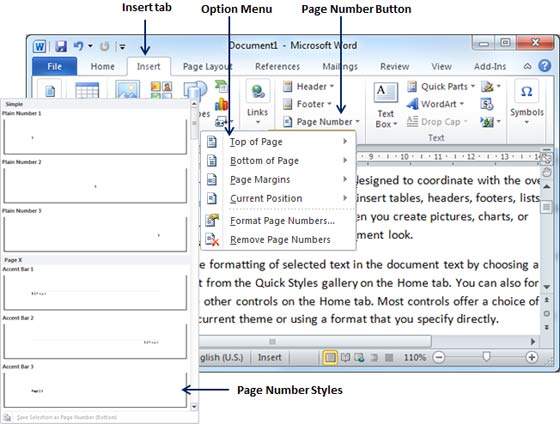
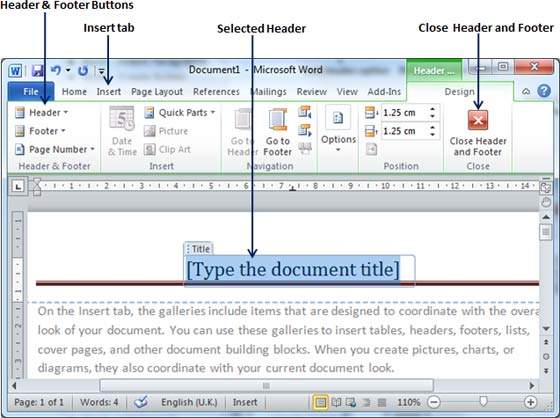
Step 1 − Click the Insert tab, and click either the Header button or the Footer button that which needs to be added first. Assume you are going to add Header; when you click the Header button it will display a list of built-in Headers from where you can choose any of the headers by simply clicking on it.

Header and Footer

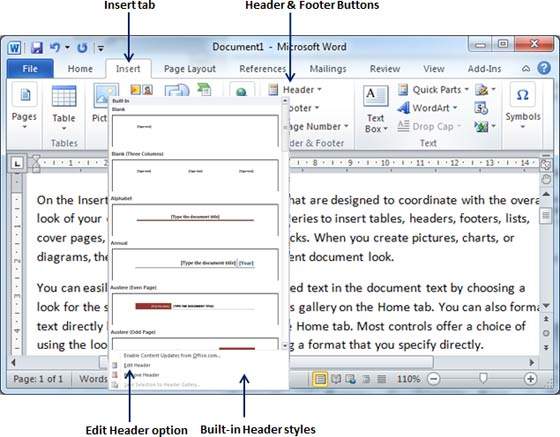
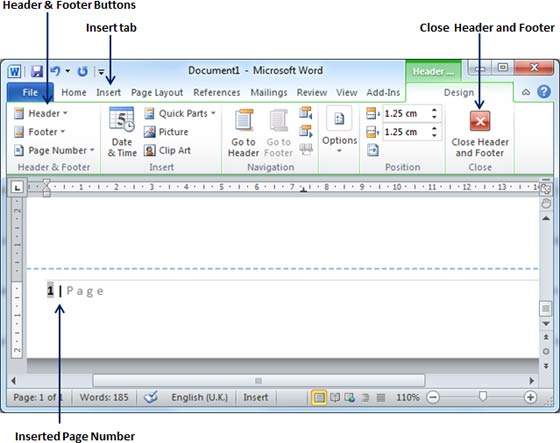
Step 2 − Once you select any of the headers, it will be applied to the document in editable mode and the text in your document will appear dimmed, Header and Footer buttons appear on the Ribbon and a Close Header and Footer button will also appear at the top-right corner.

Selected Header

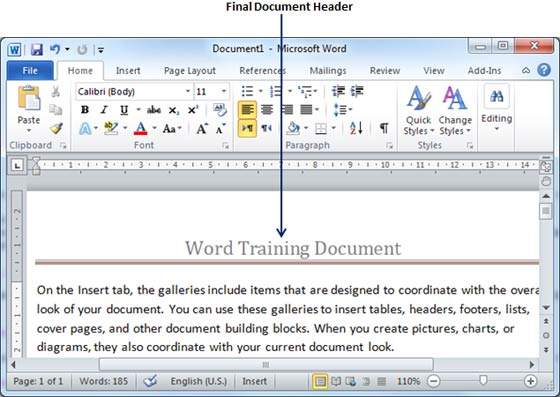
Step 3 − Finally, you can type your information whatever you want to have in your document header and once you are done, click Close Header and Footer to come out of the header insertion mode. You will see the final result as follows.

Applied Header

You can follow a similar procedure to add footer in your document.

Edit Header and Footer

The following steps will help you understand how to edit the existing header or footer of your document.

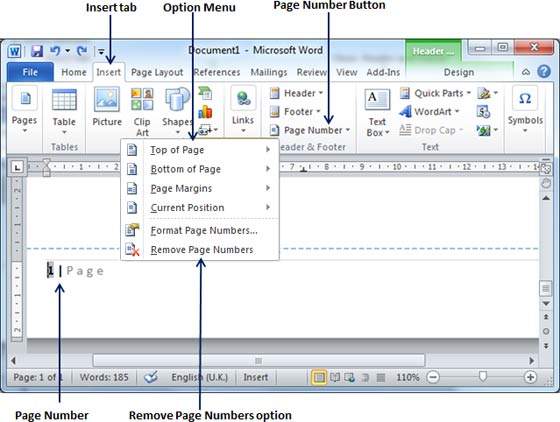
Step 1 − Click the Insert tab, and click either the Header button or Footer button or whatever you want to edit. Assume you are going to edit the Header, so when you click the Header button it will display a list of options including the Edit Header option.

Header and Footer

Step 2 − Click on the Edit Header option and Word will display the editable header as shown in the following screenshot.

Edit Header

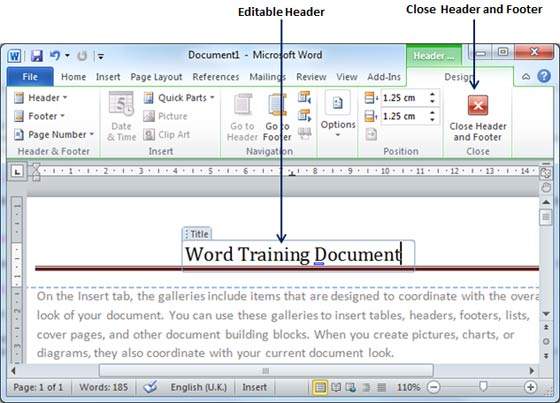
Step 3 − Now you can edit your document header and once you are done, click Close Header and Footer to come out of the edit header mode.

You can follow a similar procedure to edit the footer in your document.

Tuesday, January 10, 2023

Adjust Page Margins


In this chapter, we will discuss how to adjust page margins in Word 2010. Margins are the space between the edge of the paper and the text. You can adjust the right, left, top, and bottom margins of your document. By default, Word sets all margins left, right, top, and bottom to 1 inch.

In the screenshot given below, I have shown top, left and right margins, if you will type the complete page, word will leave 1-inch bottom margin as well.

Page Margin

Adjust Margins

The following steps will help you understand how to set margins for an open document.

Step 1 − Open the document the margins of which need to be set. If you want the margins to be applied only to a selected part of a document, select that particular part.

Step 2 − Click the Page Layout tab, and click the Margins button in the Page Setup group. This will display a list of options to be selected but you have to click the Custom Margins option available at the bottom.

You can also select any of the predefined margins from the list, but using custom margins option you will have more control on all the settings.

Margin Button

Step 3 − You will have to display a Page Dialog Box as shown below where you can set top, left, right and bottom margins under the Margins Tab. Select the Apply to: option to apply the margin on selected text or complete document.

Margin Dialog Box

Step 4 − If you are going to bind the document and want to add an extra amount of space on one edge for the binding, enter that amount in the Guttertext box, and select the side the gutter is on with the Gutter Position drop-down list. After setting all the desired values for all the margins, click the OKbutton to apply the margins.

Editing Microsoft Word document

Open the file that you want to edit. Choose from the following tasks:   Task Steps Edit text Click the Edit tab. Select the text...