Monday, January 30, 2023

Split Cells


In this chapter, we will discuss how to split table cells in Word 2010. Microsoft Word allows splitting a cell into multiple cells. We will understand how to split a cell into multiple smaller sub-cells.

Split a Cell

The following steps will help you split a cell into two sub-cells of a table available in word document.

Step 1 − Bring your mouse pointer position inside the cell that has to be divided into multiple cells.

Selected Cell

Step 2 − Now click the Layout tab and then click the Split Cells button; this will display a dialog box asking for the number of rows and columns to be created from the selected cell.

Cell Dialog Box

Step 3 − Select the desired number of rows and columns that have to go into the resultant cell and finally click the OK button to apply the result.

Split Cell

You can divide a cell into multiple cells either row-wise or column-wise or both.

Split a Table


In this chapter, let us discuss how to split a table in Word 2010. Microsoft Word allows splitting a table into multiple tables but a single operation will always divide a table into two tables. This chapter will teach you how to split a table into two smaller tables.

Split a Table

Following are the simple steps to split a table into two tables in a Word document.

Step 1 − Bring your mouse pointer position anywhere in the row that should appear as the first row of the new table.

Selected Row

Step 2 − Now click the Layout tab and then click the Split Table button which will split the table into two tables and the selected row will become the first row of the lower table.

Split Table

After splitting the table into two tables, you can further divide it into two parts and you can continue dividing the Word tables as long as a table has more than one row.

Split Table

Friday, January 27, 2023

Merging Cells


In this chapter, we will discuss how to merge table cells in Word 2010. Microsoft Word allows the merging of two or more cells to create one large cell. You will frequently need to merge columns of the top row to create the title of the table. You can merge cells either row-wise or column-wise, rather you cannot merge cells diagonally. This chapter will teach you how to merge multiple rows or columns.

Merging Cells

The following steps will help you merge table cells in a Word document.

Step 1 − Bring your mouse pointer position inside the first cell that you want to merge. Now press the Shift key and click the cells around the cell which you want to merge into the first cell. This will highlight the cells which you click and they will be ready to be merged.

Selected Cells

Step 2 − Now click the Layout tab and then click the Merge Cells button which will merge all the selected cells.

Merged Cells

After merging the cells, all the content of the cells will be scrambled which you can fix later as you like. For example, you can convert the merged cells text into title or some other description. For example, let us have center-aligned and bigger font text as follows on top of the table.

Wednesday, January 25, 2023

Resize a Table


In this chapter, we will discuss how to resize a table in Word 2010. Microsoft Word allows to resize a table to make it smaller and bigger as per your requirement.

Resize a Table

The following steps will help you resize a table available in a Word document.

Step 1 − Bring your mouse pointer over the table which you want to resize. As soon as you bring your mouse pointer inside the table, a small Cross Iconwill appear at the top-left corner and a small Resize Icon will appear at the bottom-right corner of the table as shown below.

Resize Icon

Step 2 − Bring the mouse pointer over the Resize Icon till it changes to a diagonal doublesided arrow and this is the time when you need to press the left mouse button and keep holding the button while resizing the table. Drag the table up to make it shorter or down to make it larger. You can drag the table diagonally to simultaneously change both the width and the height of the table.

Resized Table

Move a Table


In this chapter, we will discuss how to move a table in Word 2010. Microsoft Word allows to move a table from one location to another location along with its content. This chapter will give you simple steps to move a table within the same document, though you can move a table from one document to another document using the cut and paste operation.

Move a Table

The following steps will help you move a table within the same Word document.

Step 1 − Bring your mouse pointer over the table which you want to move from one location to another location. As soon as you bring your mouse pointer inside the table, a small Cross Icon will appear at the top-left corner of the table as shown below.

Add Row

Step 2 − Click over the small Cross Icon which will select the whole table. Once the table is selected, use the Cut button or simply press the Ctrl + Xkeys to cut the table from its original location.

Step 3 − Bring your insertion point at the location where you want to move the table and use Paste button or simply press Ctrl + V keys to paste the table at the new location.

Moved Table

Tuesday, January 24, 2023

Rows & Columns


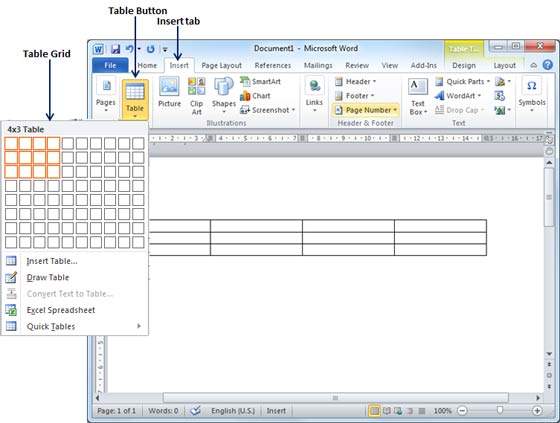
In this chapter, we will discuss how to work with rows and columns in Word 2010. As discussed in the previous chapter, a table is a structure of vertical columns and horizontal rows with a cell at every intersection. A Word table can contain as many as 63 columns but the number of rows is unlimited. This chapter will teach you how to add and delete rows and columns in a table.

Add a Row

Following are the simple steps to add rows in a table of a word document.

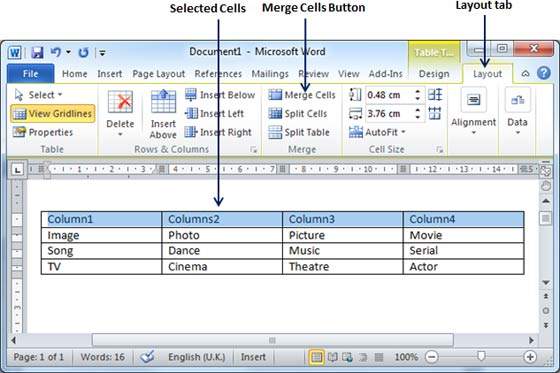
Step 1 − Click a row where you want to add an additional row and then click the Layout tab; it will show the following screen.

Add Row

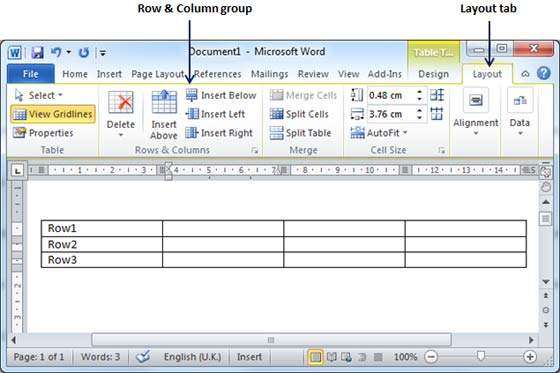
Step 2 − Now use the Row & Column group of buttons to add any row below or above to the selected row. If you click the Insert Below button, it will add a row just below the selected row as follows.

Newly Added Row

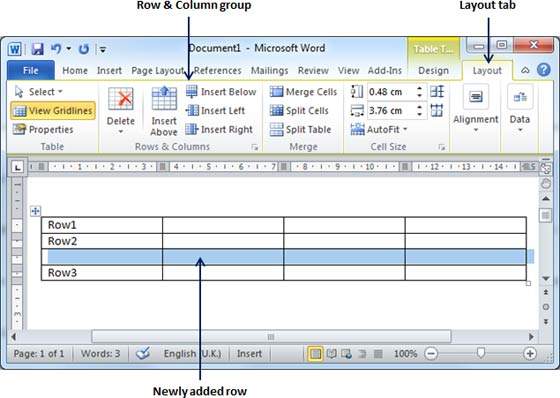
If you click the Insert Above button, it will add a row just above the selected row.

Delete a Row

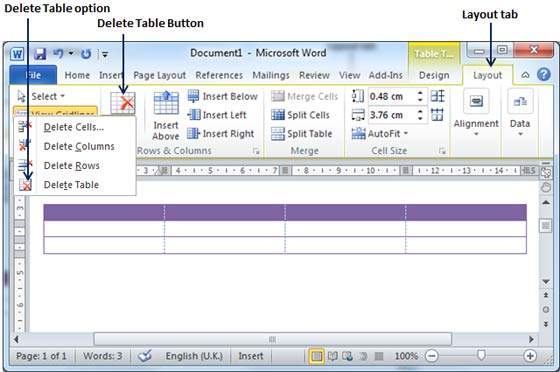
The following steps will help you delete rows from a table of a Word document.

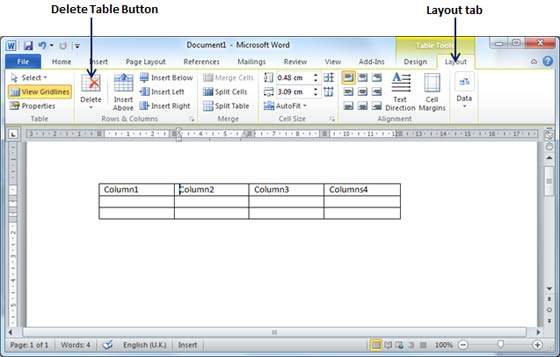
Step 1 − Click a row which you want to delete from the table and then click the Layout tab; it will show the following screen.

Delete Row

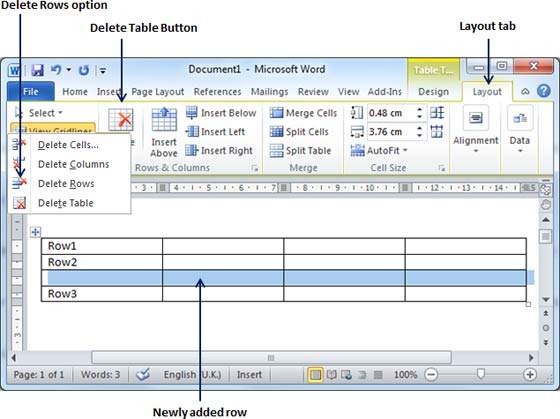
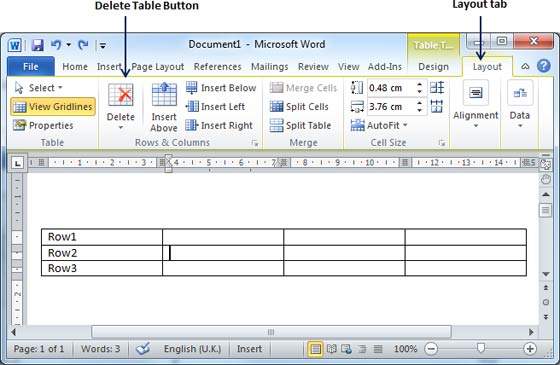
Step 2 − Click the Layout tab, and then click the Delete Rows option under the Delete Table Button to delete the selected row.

Delete Selected Row

Add a Column

The following steps will help you add columns in a table of a Word document.

Step 1 − Click a column where you want to add an additional column and then click the Layout tab; it will show the following screen.

Add Column

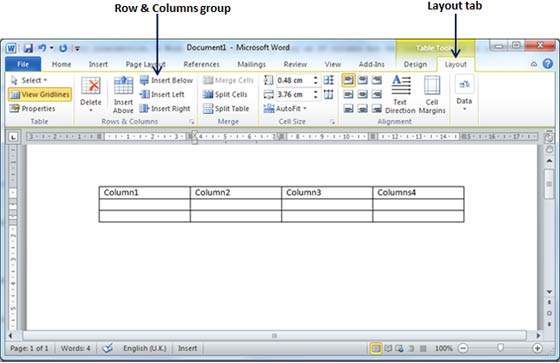
Step 2 − Now use the Row & Column group of buttons to add any column to the left or right of the selected column. If you click the Insert Left button, it will add a column just left to the selected column as follows.

Newly Added Column

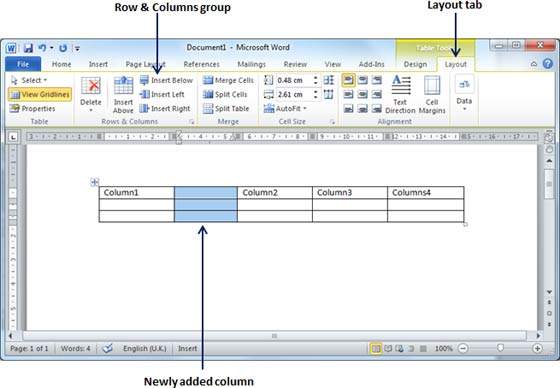
If you click the Insert Right button, it will add a column just next to the selected column.

Delete a Column

Following are the simple steps to delete columns from a table of a word document.

Step 1 − Click a column which you want to delete from the table and then click the Layout tab; it will show the following screen.

Delete Row

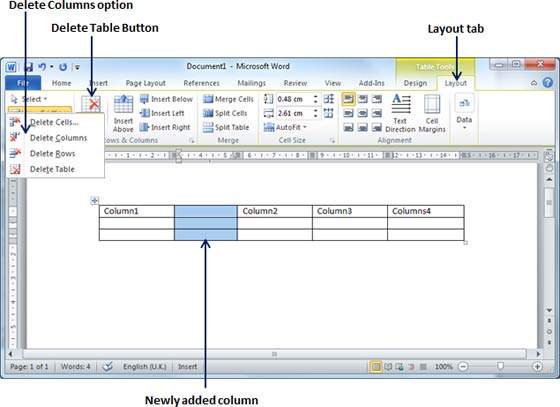
Step 2 − Click the Layout tab, and click the Delete Column option under the Delete Table Button to delete the selected column.

Delete Selected Column

Monday, January 23, 2023

Create a Table


In this chapter, we will discuss how to create a table in Word 2010. A table is a structure of vertical columns and horizontal rows with a cell at every intersection. Each cell can contain text or graphics, and you can format the table in any way you want. Usually the top row in the table is kept as a table header and can be used to put some informative instruction.

Create a Table

The following steps will help you understand how to create a table in a Word document.

Step 1 − Click the Insert tab followed by the Table button. This will display a simple grid as shown below. When you move your mouse over the grid cells, it makes a table in the table that appears in the document. You can make your table having the desired number of rows and columns.

Table Grid

Step 2 − Click the square representing the lower-right corner of your table, which will create an actual table in your document and Word goes in the table design mode. The table design mode has many options to work with as shown below.

Create Table

Step 3 − This is an optional step that can be worked out if you want to have a fancy table. Click the Table Styles button to display a gallery of table styles. When you move your mouse over any of the styles, it shows real time preview of your actual table.

Table Styles

Step 4 − To select any of the styles, just click the built-in table style and you will see that the selected style has been applied on your table.

Table Styles

Delete a Table

Following are the simple steps to delete an existing table from a word document.

Step 1 − Click anywhere in the table you want to delete.

Step 2 − Click the Layout tab, and click the Delete Table option under the Delete Table Button to delete the complete table from the document along with its content.

Delete Table

How to Close a Document in Microsoft Word

Learn the two most common ways to close a Microsoft Word document. This feature works the same in all modern versions of Microso...