Friday, February 3, 2023

Quick Styles


In this chapter, we will discuss how to apply quick styles in Word 2010. Microsoft Word provides a gallery of Quick Styles that you can apply to headings, titles, text, and lists. Quick styles come with canned formatting choices, such as font, boldface, and color which we will understand in this chapter.

Apply Quick Styles

The following steps will help you understand how to apply quick styles to a selected portion of text.

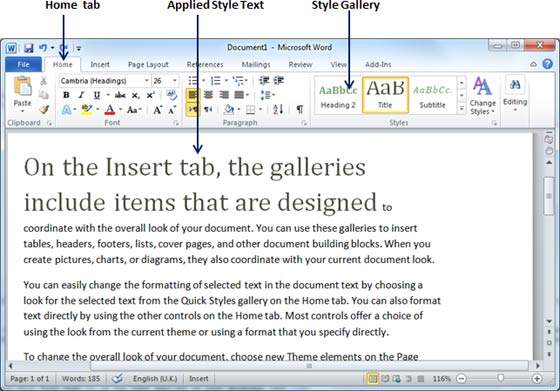
Step 1 − Select a portion of text to which you want to apply some style. Using style, you can change the selected portion of text as a heading or subheading or title of the document. You can try using different styles on your text based on your requirement.

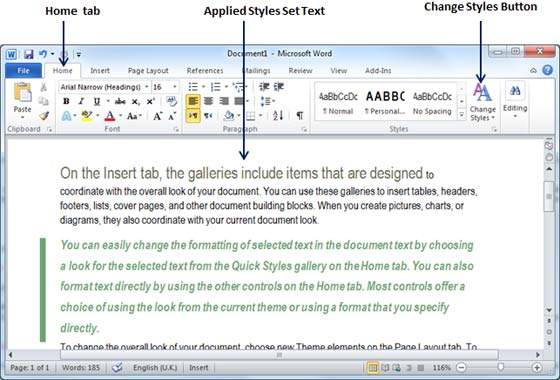
Step 2 − Click the Home tab and then move your mouse pointer over the available styles in the Style Gallery. You will see that the selected portion of text will change its style based on the selected style. You can display more available styles by clicking the More Style button.

Style Gallery

Step 3 − Finally, to apply a selected style, click over the style and you will find that it is has been applied on the selected portion of text.

Applied Style Text

You can bring a text to its normal appearance by selecting the Normal style available in the Style Gallery.

Change Styles

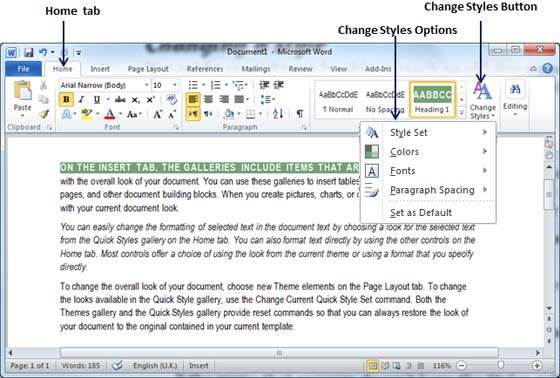
The Change Style function allows you to change the default font, color, paragraph spacing and style set for a document. The following steps will help you change the default style.

Step 1 − Open the document the style of which needs to be changed. Click the Home tab and then click the Change Styles button; this will show you all the options that can be changed. You can change the Style, the Font, the Color and the Spacing of the paragraph.

Change Style Options

Step 2 − If the style set needs to be changed, click the Style Set option; this will display a submenu to select any of the available style set. When you move your mouse over the different style sets, you will get real time text preview to give an idea about the final result.

Set Style Menu

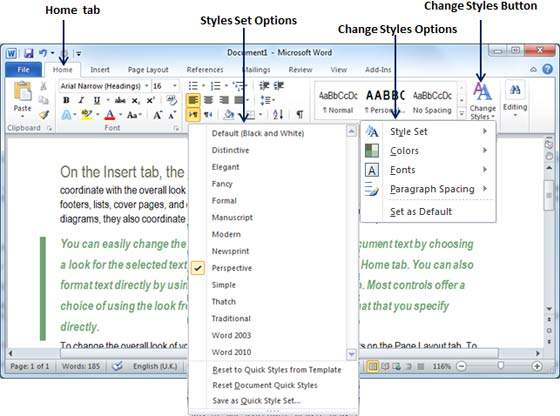
Step 3 − To apply a selected style set, click over the style set and you will find that it is has been applied on your document.

Applied Style Set

Similarly, you can try applying Font, Color and Paragraph Spacing. You can try these options yourself.

Wednesday, February 1, 2023

Borders & Shades


In this chapter, we will discuss how to apply table borders and shades in Word 2010. Microsoft Word allows you to place a border on any or all of the four sides of a table very similar to text, paragraphs, and pages. You can also add shades to table rows and columns. This chapter will teach you how to add borders (left, right, top or bottom) around a table and how to add different shades to various rows and columns of the table.

Add Borders to Table

The following steps will help you add borders in a table cell available in Word document.

Step 1 − Select the table to which you want to add border. To select a table, click over the table anywhere which will make the Cross icon visible at the top-left corner of the table. Click this cross icon to select the table.

Step 2 − Click the Border button to display a list of options to put a border around the selected table. You can select any of the option available by simply clicking over it.

Table Border

Step 3 − Try to add and remove different borders like left, right, top or bottom by selecting different options from the border options.

Table Border2

Step 4 − You can apply border to any of the selected row or column. You can try it yourself.

Step 5 − To delete the existing border, simply select the No Border option from the border options.

Using Border Options

You can add borders of your choice to word table by following the simple steps given below.

Step 1 − Click the Border button to display a list of options to put a border. Select the Border and Shading option available at the bottom of the list of options as shown in the above screenshot. This will display a Border and Shading dialog box. This dialog box can be used to set borders and shading around a selected table.

Table Border Options

Step 2 − Click the Border tab; this will display a list of border settings, styles and options whether this border should be applied to the table or text or paragraph.

Step 3 − You can use the Preview section to disable or enable left, right, top or bottom borders of the selected table or row or column. Follow the given instructions in the preview section itself to design the border you like.

Step 4 − You can customize your border by setting its color, width by using different width thickness available under the style section.

Stylish Table Border

Add Shades To Table

The following steps will help you add shades on a selected table or its rows or columns.

Step 1 − Select a row or column where you want to apply a shade of your choice.

Selected Table Row

Step 2 − Click the Border button to display a list of options to put a border. Select the Border and Shading option available at the bottom of the list of options. This will display a Border and Shading dialog box. This dialog box can be used to set borders and shading around selected row(s) or column(s).

Table Shading

Step 2 − Click the Shading tab which will display options to select fill, colorand style and whether this border should be applied to cell or table or selected portion of text.

Step 3 − You can use the Preview section to have an idea about the expected result. Once you are done, click the OK button to apply the result.

Tuesday, January 31, 2023

Add Formula


In this chapter, we will discuss how to add formula to a table in Word 2010. Microsoft Word allows you to use mathematical formula in table cells which can be used to add numbers, to find the average of numbers, or find the largest or the smallest number in table cells you specify. There is a list of formulae, you can choose from the many based on the requirement. This chapter will teach you how to use formula in word tables.

Add a Formula

Following are the simple steps to add formula in a table cell available in Word document.

Step 1 − Consider the following table with the total number of rows. Click in a cell that should contain the sum of the rows.

Salary Table

Step 2 − Now click the Layout tab and then click the Formula button; this will display a Formula Dialog Box which will suggest a default formula, which is =SUM(LEFT) in our case. You can select a number format using Number Format List Box to display the result or you can change the formula using the Formula List Box.

Formula Dialog Box

Step 3 − Now click OK to apply the formula and you will see that the left cells have been added and the sum has been put in the total cell where we wanted to have it. You can repeat the procedure to have the sum of other two rows as well.

Sum Result

Cell Formulae

The Formula dialog box provides the following important functions to be used as formula in a cell.

S.NoFormula & Description
1

AVERAGE( )

The average of a list of cells

2

COUNT( )

The number of items in a list of cells

3

MAX( )

The largest value in a list of cells

4

MIN( )

The smallest value in a list of cells

5

PRODUCT( )

The multiplication of a list of cells

6

SUM( )

The sum of a list of cells

We assume you are familiar with how to create a spreadsheet program; you can construct your word cell formula. Word formulae uses a reference system to refer to an individual table cells. Each column is identified by a letter, starting with A for the first column, B for the second column, and so on. After the letter comes the row number. Thus, the first cell in the first row is A1, the third cell in the fourth row is C4, and so on.

Following are useful points to help you in constructing a word cell formula.

S.NoCell References and Description
1A single cell reference, such as B3 or F7
2A range of cells, such as A4:A9 or C5:C13
3A series of individual cells, such as A3, B4, C5
4ABOVE, referring to all cells in the column above the current cell.
5BELOW, referring to all cells in the column below the current cell.
6LEFT, referring to all cells in the row to the left of the current cell
7RIGHT, referring to all cells in the row to the right of the current cell

You can also construct simple Math expressions, such as B3+B5*10 by using simple mathematical operators +, -, /, *, %.

Monday, January 30, 2023

Split Cells


In this chapter, we will discuss how to split table cells in Word 2010. Microsoft Word allows splitting a cell into multiple cells. We will understand how to split a cell into multiple smaller sub-cells.

Split a Cell

The following steps will help you split a cell into two sub-cells of a table available in word document.

Step 1 − Bring your mouse pointer position inside the cell that has to be divided into multiple cells.

Selected Cell

Step 2 − Now click the Layout tab and then click the Split Cells button; this will display a dialog box asking for the number of rows and columns to be created from the selected cell.

Cell Dialog Box

Step 3 − Select the desired number of rows and columns that have to go into the resultant cell and finally click the OK button to apply the result.

Split Cell

You can divide a cell into multiple cells either row-wise or column-wise or both.

Split a Table


In this chapter, let us discuss how to split a table in Word 2010. Microsoft Word allows splitting a table into multiple tables but a single operation will always divide a table into two tables. This chapter will teach you how to split a table into two smaller tables.

Split a Table

Following are the simple steps to split a table into two tables in a Word document.

Step 1 − Bring your mouse pointer position anywhere in the row that should appear as the first row of the new table.

Selected Row

Step 2 − Now click the Layout tab and then click the Split Table button which will split the table into two tables and the selected row will become the first row of the lower table.

Split Table

After splitting the table into two tables, you can further divide it into two parts and you can continue dividing the Word tables as long as a table has more than one row.

Split Table

Friday, January 27, 2023

Merging Cells


In this chapter, we will discuss how to merge table cells in Word 2010. Microsoft Word allows the merging of two or more cells to create one large cell. You will frequently need to merge columns of the top row to create the title of the table. You can merge cells either row-wise or column-wise, rather you cannot merge cells diagonally. This chapter will teach you how to merge multiple rows or columns.

Merging Cells

The following steps will help you merge table cells in a Word document.

Step 1 − Bring your mouse pointer position inside the first cell that you want to merge. Now press the Shift key and click the cells around the cell which you want to merge into the first cell. This will highlight the cells which you click and they will be ready to be merged.

Selected Cells

Step 2 − Now click the Layout tab and then click the Merge Cells button which will merge all the selected cells.

Merged Cells

After merging the cells, all the content of the cells will be scrambled which you can fix later as you like. For example, you can convert the merged cells text into title or some other description. For example, let us have center-aligned and bigger font text as follows on top of the table.

Wednesday, January 25, 2023

Resize a Table


In this chapter, we will discuss how to resize a table in Word 2010. Microsoft Word allows to resize a table to make it smaller and bigger as per your requirement.

Resize a Table

The following steps will help you resize a table available in a Word document.

Step 1 − Bring your mouse pointer over the table which you want to resize. As soon as you bring your mouse pointer inside the table, a small Cross Iconwill appear at the top-left corner and a small Resize Icon will appear at the bottom-right corner of the table as shown below.

Resize Icon

Step 2 − Bring the mouse pointer over the Resize Icon till it changes to a diagonal doublesided arrow and this is the time when you need to press the left mouse button and keep holding the button while resizing the table. Drag the table up to make it shorter or down to make it larger. You can drag the table diagonally to simultaneously change both the width and the height of the table.

Resized Table

Data Link Layer

In the OSI model, the data link layer is a 4 th  layer from the top and 2 nd  layer from the bottom. The communication channel t...