Wednesday, March 15, 2023

Sidebars


PowerPoint slides have a left-hand side bar which offers two invaluable views. These views are great to review the slides and edit them. The side bar is available in the Normal view and by default, it is set to the Slides tab.

Microsoft PowerPoint 2010

Slides Tab

This tab shows all the slides stacked vertically in a sequential manner. You can select individual slides from this tab and also perform some tasks like changing slide layouts, reordering slides, inserting new slides, deleting slides, etc. Although you cannot edit the slide contents from this tab, you can select the slide and make edits from the slide displayed to the right.

Outline Tab

This is the tab right next to the Slides tab and as the name suggests, this provides the outline for the slide. This section just displays all the textual content from every slide - this can be very useful if there is a lot of non-text content in the slide and reviewing just the written part gets difficult. Unlike in the slides tab, you can edit the text from this section.

Microsoft PowerPoint 2010

If you need greater viewing space, you can close the sidebar by click on the X on the top right of this bar.

Microsoft PowerPoint 2010

To recover the sidebar, just click on the Normal view icon again.

Microsoft PowerPoint 2010

Monday, March 13, 2023

Working With Outlines

PowerPoint is a great program that allows you to bring together text, images, shapes and multimedia. However, sometimes you may just want to review the text without focusing on the non-text aspects of the slide deck. This is where the Outline view in PowerPoint is quite useful. The Outline view can be accessed from the tab adjacent to the Slide tab in the Normal view.

Microsoft PowerPoint 2010

The outline view shows just the text content from various slides. This view does not show the text entered in the non-text box like SmartArt, WordArt or any other shapes.

Microsoft PowerPoint 2010

By default, the outline pane size is the same as the slide tab pane; hence it is small. However, you can drag the pane out to increase the size to improve readability.

Microsoft PowerPoint 2010

Sunday, March 12, 2023

Managing Sections


Given the popularity of PowerPoint and its versatility, there are situations when you are dealing with very large slide decks or just collaborating with different people to build the slides. In such cases, it is always helpful to be able to segregate the slides into smaller groups and work with these groups. PowerPoint 2010 introduces the concept of sections to achieve this. Here are the main functions you can execute with sections.

Creating Sections

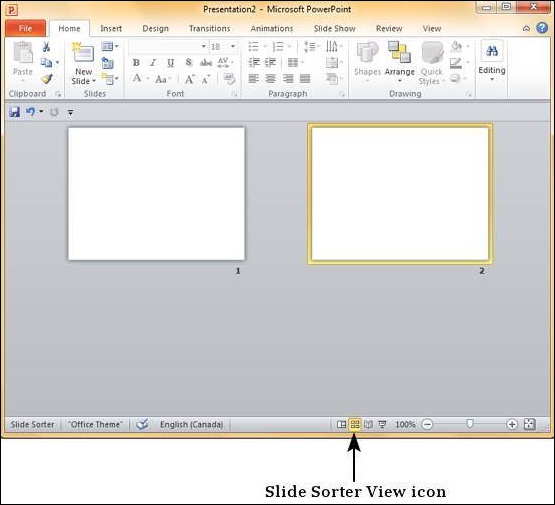
The steps to create a new section are as follows. You can execute these steps from the Normal view or the Slide Sorter view.

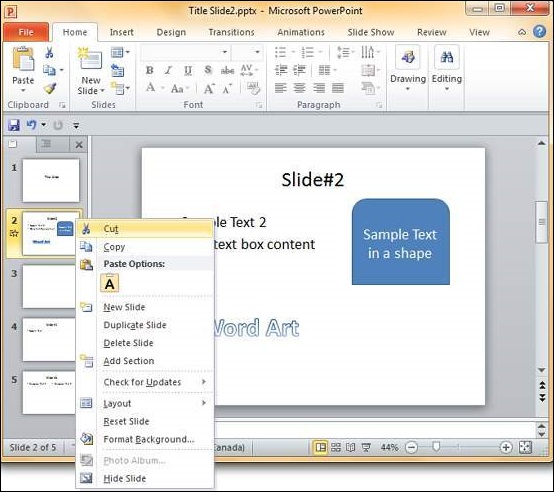
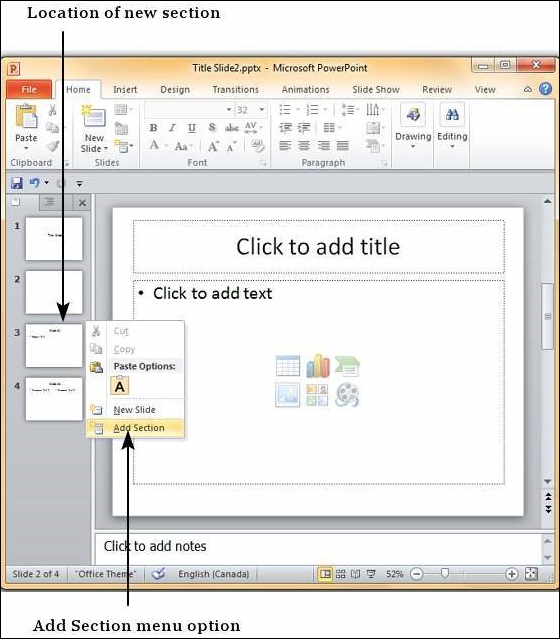
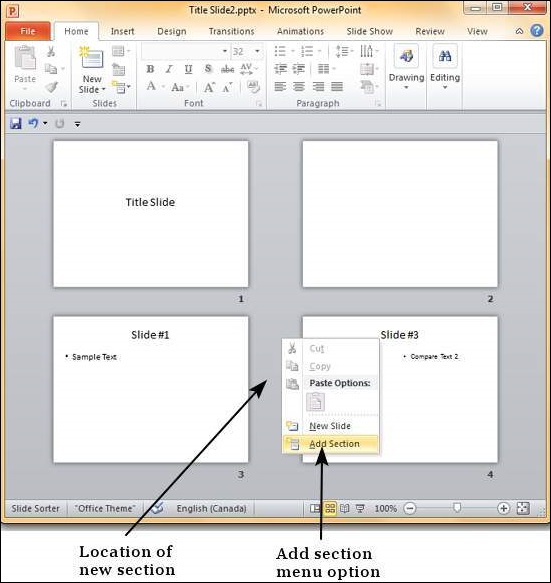
Step 1 − In the Normal view or the Slide Sorter view, right-click at the position where you want to add the section and select add section.

Microsoft PowerPoint 2010


Microsoft PowerPoint 2010

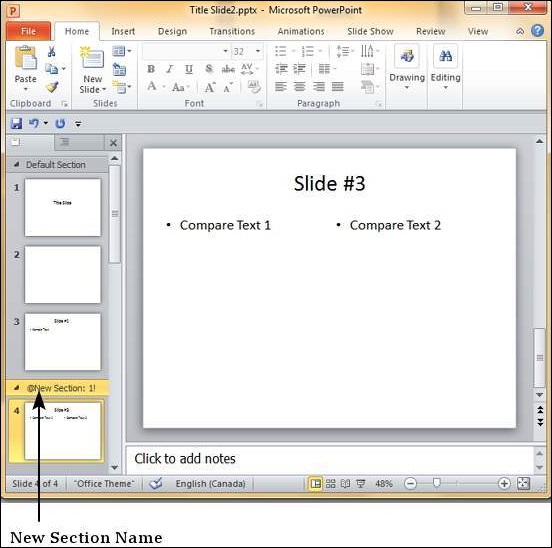
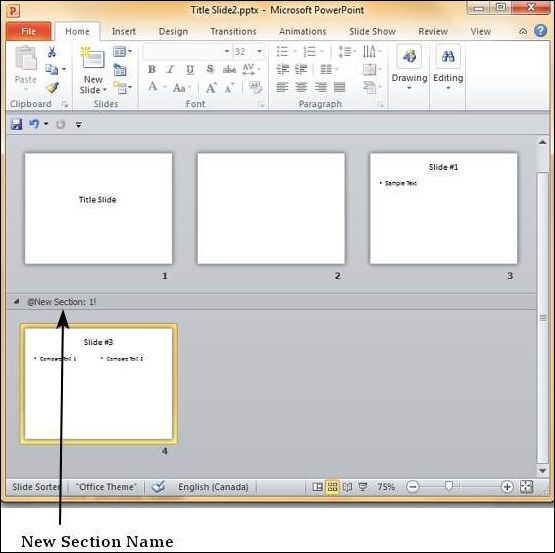
Step 2 − The new section gets added to the presentation with all the subsequent slides being included in this section.

Microsoft PowerPoint 2010


Microsoft PowerPoint 2010

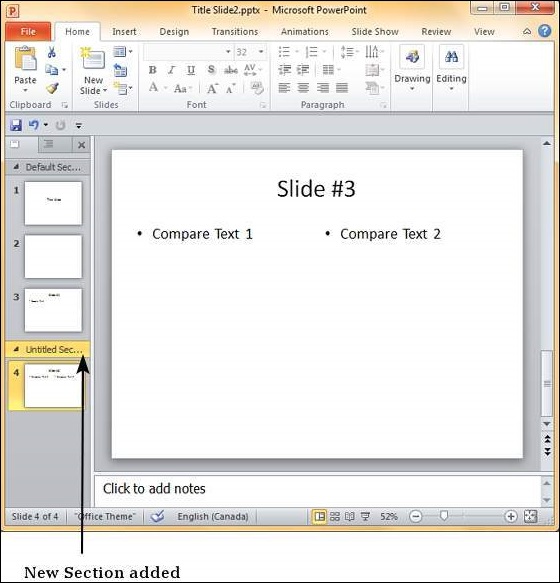
Step 3 − By default, the new section is named "Untitled Section" but you can change the section name. Right-click on the section and select "Rename Section".

Microsoft PowerPoint 2010


Microsoft PowerPoint 2010

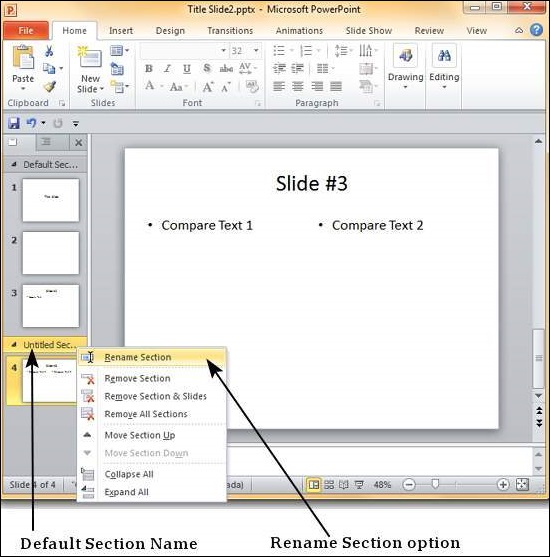
Step 4 − In the Rename Section dialog box, enter the new section name. This accepts all the characters including alphabets, numbers, special characters, punctuations, etc.

Microsoft PowerPoint 2010

Step 5 − Click on the "Rename" button on the dialog to rename the section.

Microsoft PowerPoint 2010


Microsoft PowerPoint 2010

Rearranging Sections

One of the advantages of sections is that you can not only group slides together, but also rearrange them as one set. Instead of having to move each slide individually, you can move the entire section. Just like rearranging slides you can drag and move the sections. Alternately, you can right-click on the section and move it up or down as shown below.

Microsoft PowerPoint 2010

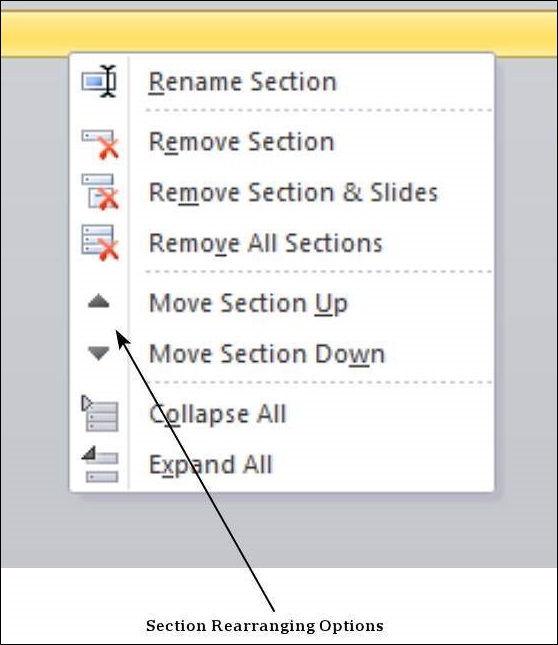
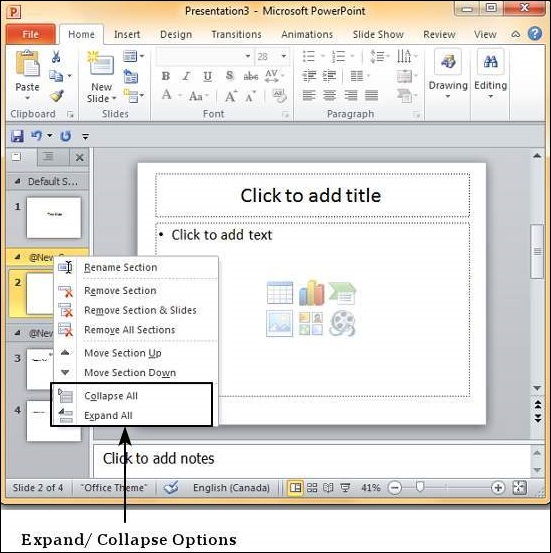
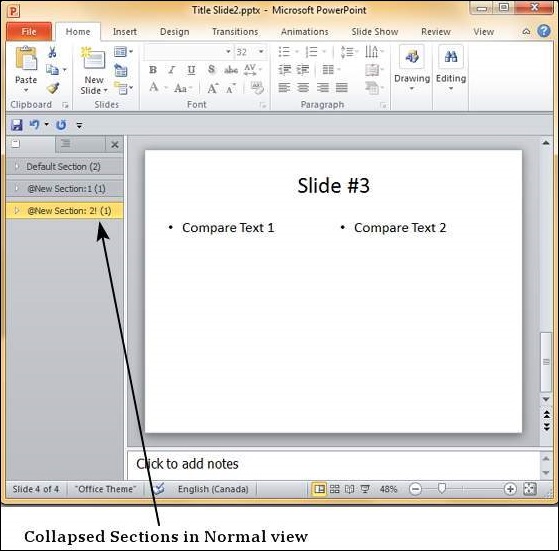
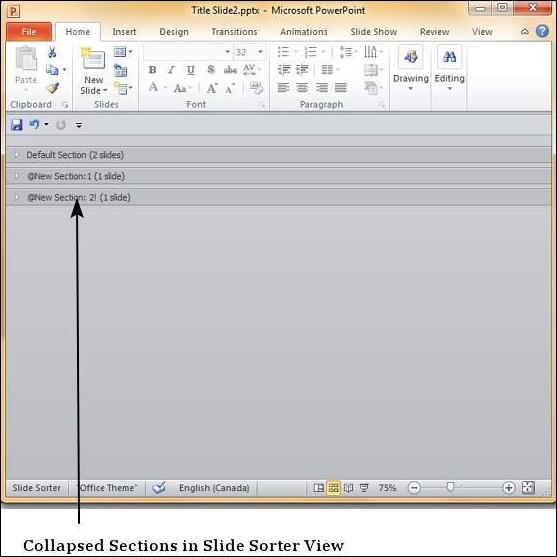
If there are many slides to work with, you can collapse them so you view just the sections. This makes rearranging them less confusing too.

Microsoft PowerPoint 2010


Microsoft PowerPoint 2010


Microsoft PowerPoint 2010

Deleting Sections

PowerPoint 2010 provides three options to delete sections. The table below explains the function of each option.
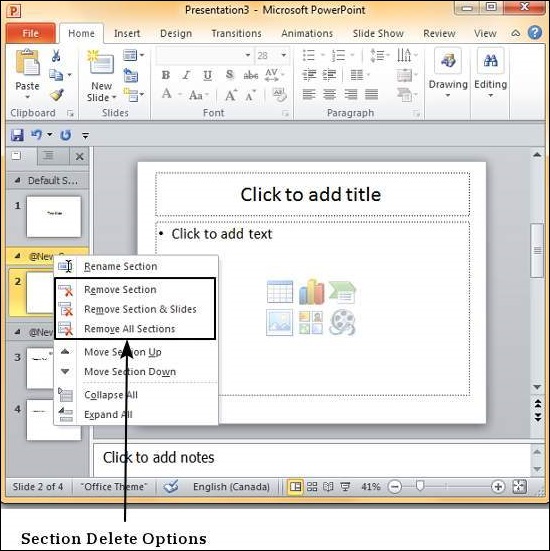
Microsoft PowerPoint 2010


S.NoDelete Option & Description
1

Remove Section

Deletes the selected section and merges slides with the previous section.

2

Remove Section & Slide

Deletes the selected section and all the slides in the section.

3

Remove All Sections

Deletes all the sections and merges all the slides into a presentation without sections.

Monday, March 6, 2023

Adding Slide Notes


Slide notes can be very useful tools for presentation. These notes are not displayed on the screen in the Slideshow mode, but the presenter can see them so they can prepare well to present the slides. Depending on your Print settings, you can also print the slide notes along with the slides.

This chapter will show you how to add slide notes to an existing presentation.

Step 1 − To locate the slide notes, set the view in Normal mode.

Microsoft PowerPoint 2010

Step 2 − The Slide Notes section is indicated by "Click to add notes".

Microsoft PowerPoint 2010

Step 3 − You can click on the top border and drag the section to increase its size to make it easier to type.

Microsoft PowerPoint 2010

Step 4 − Type your text in this section as slide notes.

Microsoft PowerPoint 2010

You can only use bullets, numbering and alignment functions in the Slide Notes section. All other functions can be selected, but can be applied only to the selected slide, not the notes.

Slide notes can be printed from the print menu under the Backstage view. From the Print Layout option, select Notes Pages or 3 Slides. Notes Pages will print a single slide with the slide notes below it. The 3 Slides will print all three slides with notes on the right side.

Microsoft PowerPoint 2010

Sunday, March 5, 2023

Rearranging Slides


Rearranging slides is important when it comes to organizing the overall presentation flow. While it is vital that you get the right content in every slide, it is equally important that you are able to present them in a format that makes it easier for the audience to understand the content too; most times this will require rearranging the slides.

You can rearrange slides from two views in PowerPoint - Normal View and Slide Sorter View. Given below are the steps to rearrange slides from different views.

Normal View

Step 1 − Select the slide to be moved.

Step 2 − Left click on the slide and drag it to the position in the sequence where you want to place it. PowerPoint will indicate the insert position with a line in-between existing slides.

Microsoft PowerPoint 2010

Step 3 − When you get to the right position release the left click button to insert the slide. Alternately you can also cut the selected slide and paste it back in the sequence as shown below.

Microsoft PowerPoint 2010


Microsoft PowerPoint 2010

Slide Sorter View

Let us now understand how the Slide Sorter View works.

Step 1 − Select the slide to be moved.

Step 2 − Left click on the slide and drag it to the position in the sequence where you want to place it. PowerPoint will indicate the insert position with a line in-between existing slides.

Microsoft PowerPoint 2010

Step 3 − When you get to the right position release the left click button to insert the slide. Alternately you can also cut the selected slide and paste it back in the sequence as shown below.

Microsoft PowerPoint 2010


Microsoft PowerPoint 2010

Deleting Existing Slide


There are times while building a slide deck, you may need to delete some slides. This can be done easily from PowerPoint. You can delete the slides from the Normal view as well as the Slide Sorter view. In each view, you can delete the slides in two ways.

Deleting from Normal View

Step 1 − Go to the Normal view.

Microsoft PowerPoint 2010

Step 2 − Right-click on the slide to be deleted and select the Delete Slideoption.

Microsoft PowerPoint 2010

Alternately, you can select the slide and press the Delete button on your key board.

Deleting from Slide Sorter View

Let us now understand how to deleted slides from the Slide Sorter View.

Step 1 − Go to the Slide Sorter view.

Microsoft PowerPoint 2010

Step 2 − Right-click on the slide to be deleted and select the Delete Slideoption.

Microsoft PowerPoint 2010

Alternately, you can select the slide and press the Delete button on your key board.

Adding Text in Boxes


PowerPoint allows users to add text to the slide in a well-defined manner to ensure the content is well distributed and easy to read. The procedure to add the text in a PowerPoint slide is always the same - just click in the text box and start typing. The text will follow the default formatting set for the text box, although this formatting can be changed later as required. What changes is the different kinds of content boxes that support text in a PowerPoint slide.

Given below are some of the most common content blocks you will see in PowerPoint.

Title Box

This is typically found on slides with the title layout and in all the slides that have a title box in them. This box is indicated by "Click to add title".

Microsoft PowerPoint 2010

Subtitle Box

This is found only in slides with the Title layout. This is indicated by "Click to add subtitle"

Content Box

This is found in most of the slides that have a placeholder for adding content. This is indicated by "Click to add text". As you can see, this box allows you to add text as well as non-text content. To add text to such a box, click anywhere on the box, except on one of the content icons in the center and start typing.

Microsoft PowerPoint 2010

Text Only Box

This is not a default content box available in PowerPoint, but you can create it using Slide Master, if required. This is also indicated by "Click to add text". The only difference between the Text Only Box and the Content Box is that the former only supports text in the content area.

Microsoft PowerPoint 2010

Editing Microsoft Word document

Open the file that you want to edit. Choose from the following tasks:   Task Steps Edit text Click the Edit tab. Select the text...