Tuesday, April 4, 2023

Content Translation


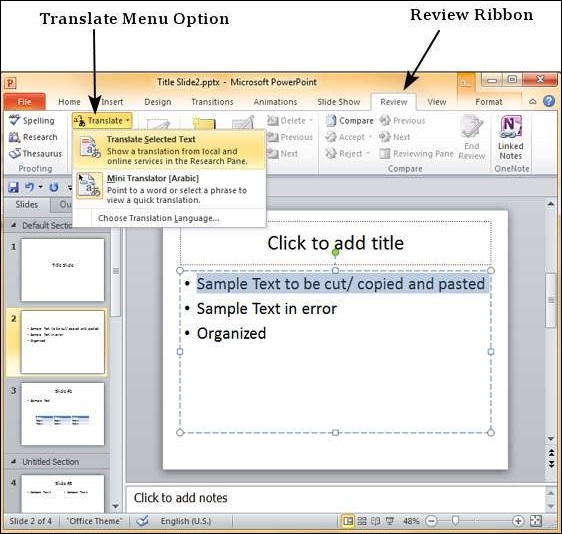
One of the newer features in PowerPoint is the content translation. This feature allows you to select content and have it translated into a different language. The following steps will help you translate content in PowerPoint.

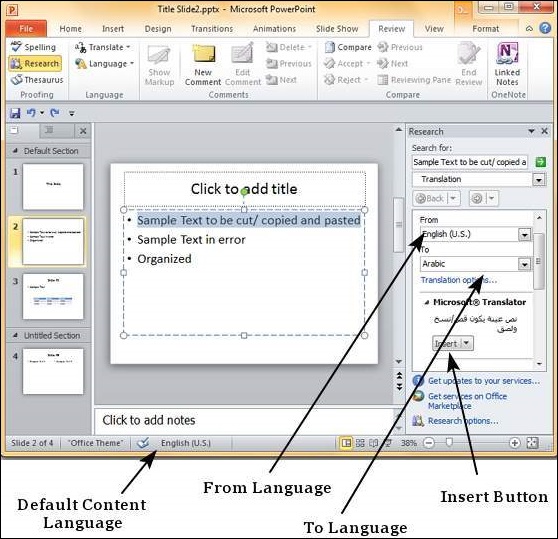
Step 1 − Select the text to be translated and click on Translate - Translate Selected Text under the Language section of the Review ribbon.

Microsoft PowerPoint 2010

Step 2 − In the research sidebar, the "From" language is set to default language settings for the content. The "To" language is set to the alphabetically first language supported by PowerPoint.

Microsoft PowerPoint 2010

Step 3 − From the "To" language dropdown, select the language you want the selected portion of text translated into. Click on Insert to replace the selected text from the default language to the new translated text.

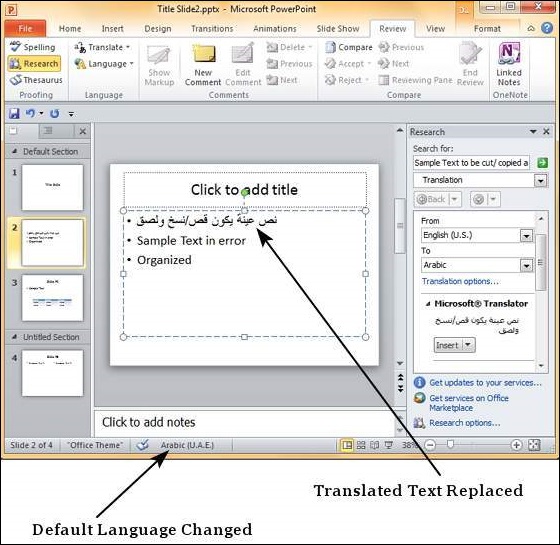
Step 4 − Notice that if you replace the portion of text using translation, the default language for the replaced text also changes automatically.

Microsoft PowerPoint 2010

Spelling Check


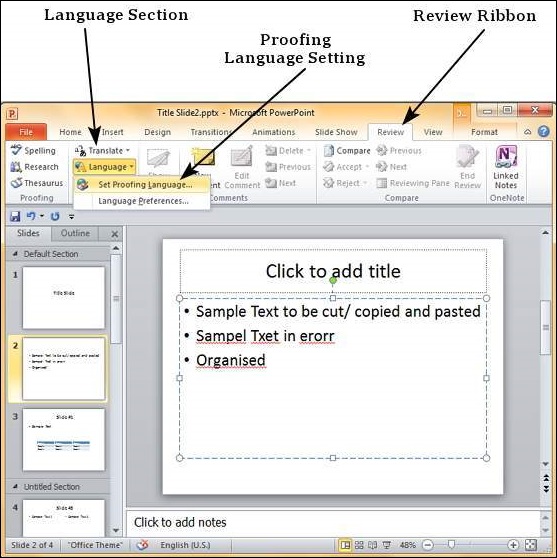
One of the best proofing tools available in PowerPoint is the spelling check. This is an automated proofing feature which will review the entire presentation for errors. To use this feature, you need to first set the Proofing language from the Language section under the Review ribbon.

Microsoft PowerPoint 2010

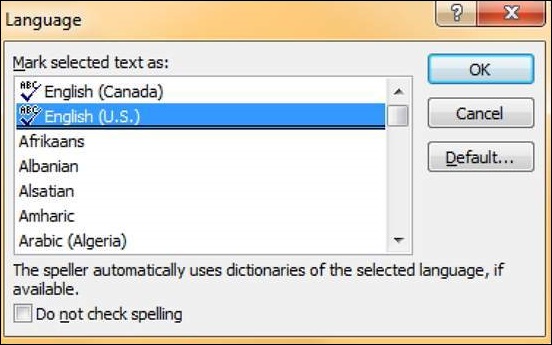
In the Language dialog, you can select the language you want to use for your presentation. If you have some content selected, you can click OK and select it for just that section. If you want to use the selected language for the entire presentation you should click default.

Microsoft PowerPoint 2010

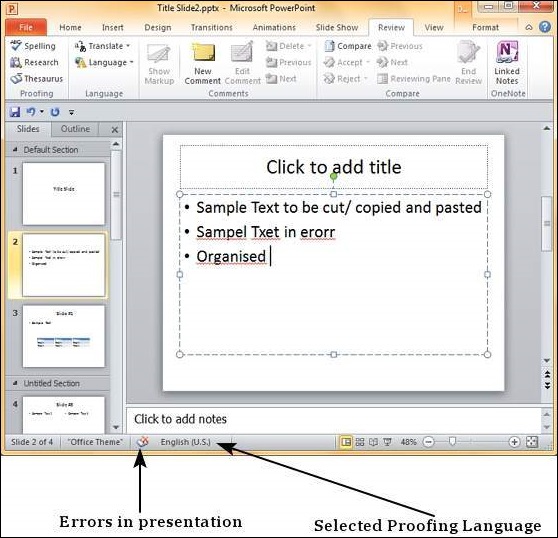
Once the proofing language is set you can see it at the bottom of the PowerPoint window. If there are proofing errors in the presentation, you will also see an icon of a book with a red cross on top of it.

Microsoft PowerPoint 2010

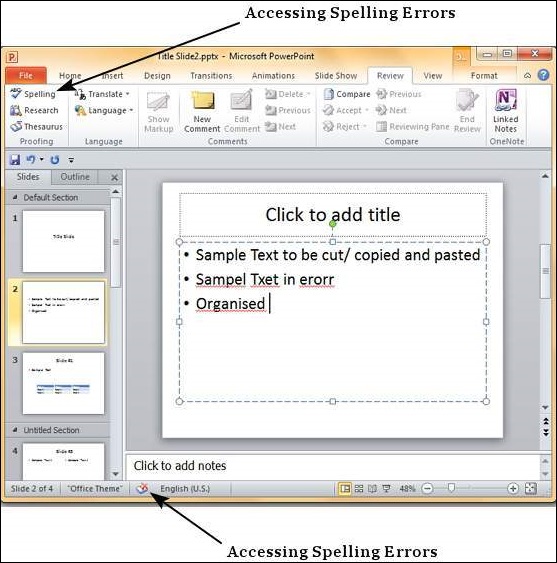
You can review the errors in the presentation by clicking on the red cross at the bottom of the window or by clicking on "Spelling" under the Proofingsection in the Review ribbon.

Microsoft PowerPoint 2010

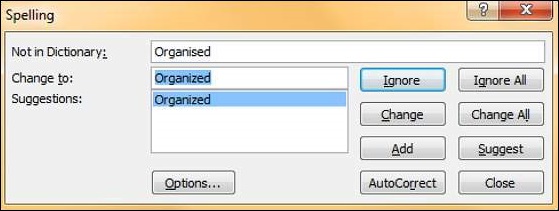
From the Spelling dialog, you can take the necessary actions to ignore, correct or edit the errors in the presentation. The table below describes the various options you have in the Spelling dialog.

Microsoft PowerPoint 2010


S.NoSpelling Dialog Option & Description
1

Ignore

Ignores the error for the current instance.

2

Ignore All

Ignores the error for all the instances in the presentation.

3

Change

Accepts the suggested change for the current instance.

4

Change All

Accepts the suggested change for all the instances in the presentation.

5

Add

Uses the first suggested word each time you click Add.

6

Suggest

Includes this word in the PowerPoint dictionary.

7

AutoCorrect

Automatically corrects similar errors going forward.

8

Close

Closes the Spelling dialog.

9

Options

Sets up how PowerPoint should proof the presentation.

Monday, April 3, 2023

Undo Edited Changes


Like any other program, there are times when you may want to undo some of the changes you made to the slides. PowerPoint offers the "Undo/ Redo" option to facilitate this. While working with the "Undo/ Redo" options, you must remember that these will always be sequential which means you can only undo actions in the order they were executed. You cannot undo the last action, retain the remaining 10 actions and undo the eleventh one. If you want to undo the eleventh action, all the subsequent 10 actions will also be undone.

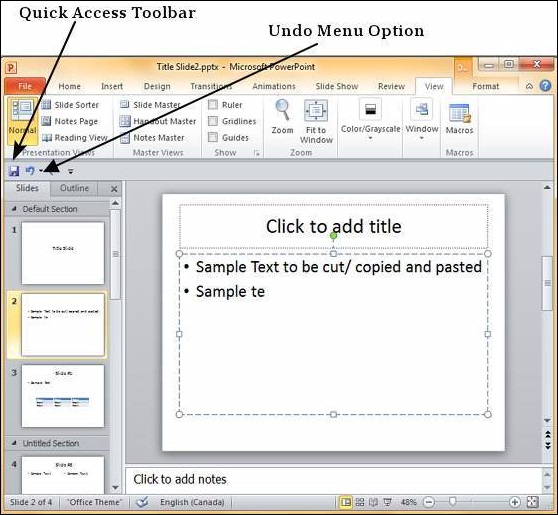
To undo the last action, click on the Undo button in the PowerPoint Quick Access bar.

Microsoft PowerPoint 2010

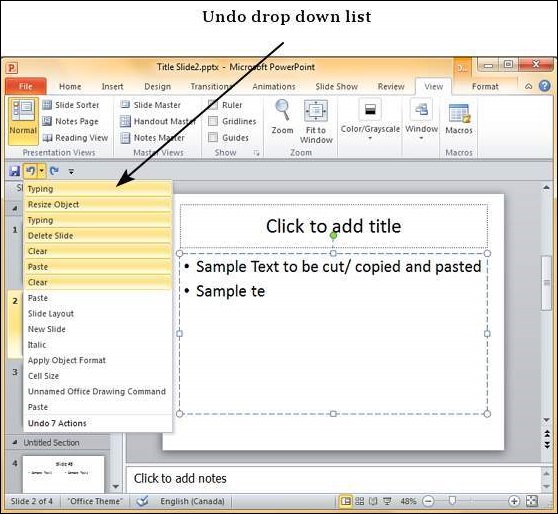
You can keep clicking on this button repeatedly to undo the series of actions; however a more graceful way of undoing multiple actions is to use the dropdown next to the undo button. Here you can select the list of actions you want to undo by sliding your cursor on top of the actions and click on them.

Microsoft PowerPoint 2010

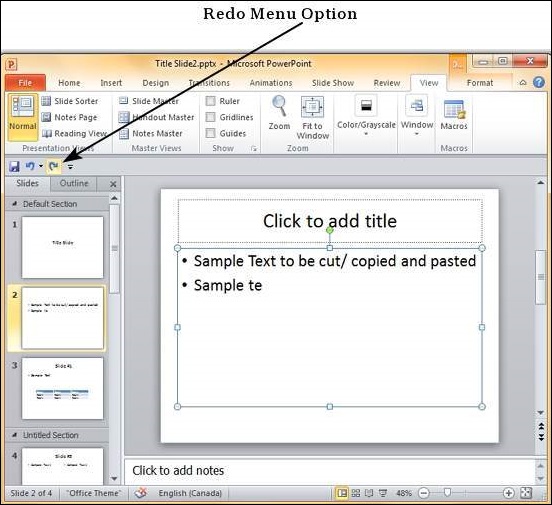
Redo is an option available only after you have undone at least one action. The redo follows the same logic as the undo option, except in the reverse order. You can click on the redo button one or more times to redo previously undone action in the sequence. You do not have the dropdown option with redo though.

Microsoft PowerPoint 2010

Friday, March 31, 2023

Find & Replace Content


PowerPoint offers its users the ability to search for specific text and if required replace it automatically. This is a very useful tool when you need to review a very large presentation or correct the same error in multiple places in the slide. Given below are the steps to find and replace text in PowerPoint. Although, you can only use this function for text, the text itself can be present in a text box, in another shape, as a WordArt, in SmartArt or tables.

Finding Content

The following steps will show you how to find content in PowerPoint.

Step 1 − In the Home tab, under the Editing section click on Find.
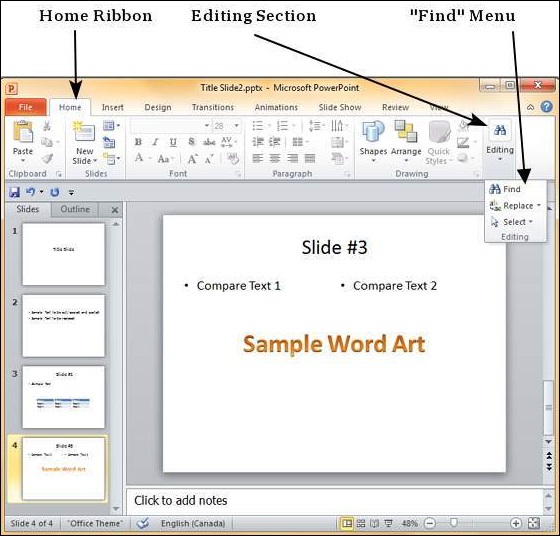
Microsoft PowerPoint 2010

Step 2 − Type the text you want to search in the "Find what:" field.
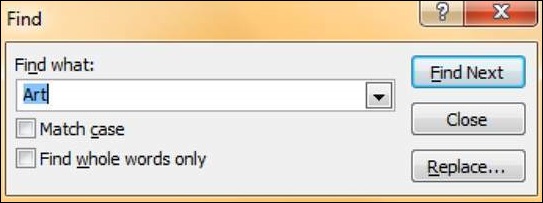
Microsoft PowerPoint 2010

Step 3 − You can narrow your search by selecting "Match Case" - to find exact case match - and "Find whole words only" - to find whole words and not words where typed word is just a part of the word.

Step 4 − Press on "Find Next" to find the next occurrence of the search word.

Step 5 − The Find dialog does not disappear after finding the first instance, so you can keep pressing "Find Next" multiple times till you reach the end of the search. At this point, you will receive a message from PowerPoint indicating the end of the search.

Microsoft PowerPoint 2010

Replacing Content

Here are the steps to replace content in PowerPoint.

Step 1 − In the Home tab, under the Editing section click on the Replacebutton.
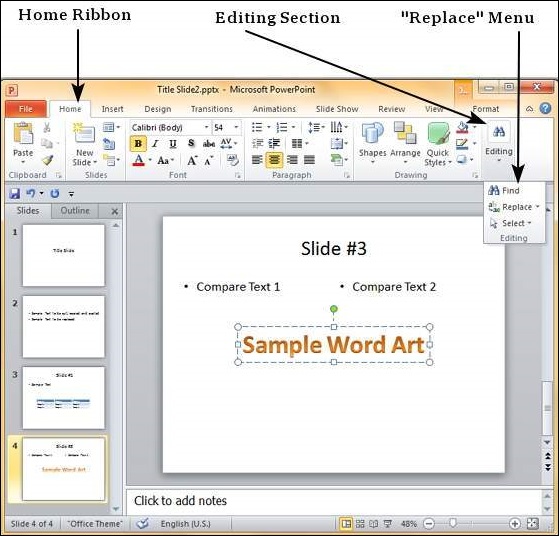
Microsoft PowerPoint 2010

Step 2 − Type the text you want to replace in the "Find what:" field and the replaced text in "Replace with:" field
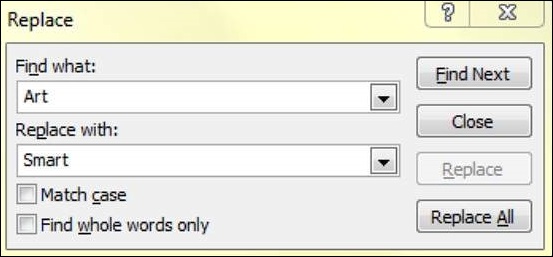
Microsoft PowerPoint 2010

Step 3 − You can narrow your search by selecting "Match Case" - to find the exact case match - and "Find whole words only" - to find the whole words and not words where typed word is just a part of the word.

Step 4 − Press on "Find Next" to find the next occurrence of the search word. PowerPoint will show you the next occurrence and you can then click on "Replace" to replace the word. If you want to skip the occurrence, you can press "Find Next" again without pressing "Replace"

Step 5 − The Replace dialog does not disappear after finding the first instance, so you can keep pressing "Find Next" multiple times till you reach the end of the search. At this point, you will receive a message from PowerPoint indicating the end of the search.

Microsoft PowerPoint 2010

Thursday, March 30, 2023

Copy and Paste Content


In this chapter, we will understand how to copy and paste content in PowerPoint 2010. PowerPoint offers to the users a wide range of options when it comes to duplicating content. PowerPoint has the standard cut and copy functions but allows variations of paste options.

Cut Option

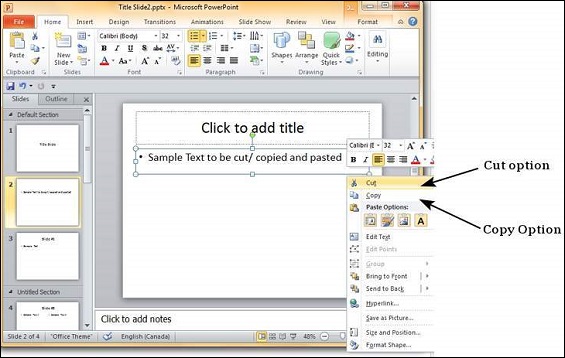
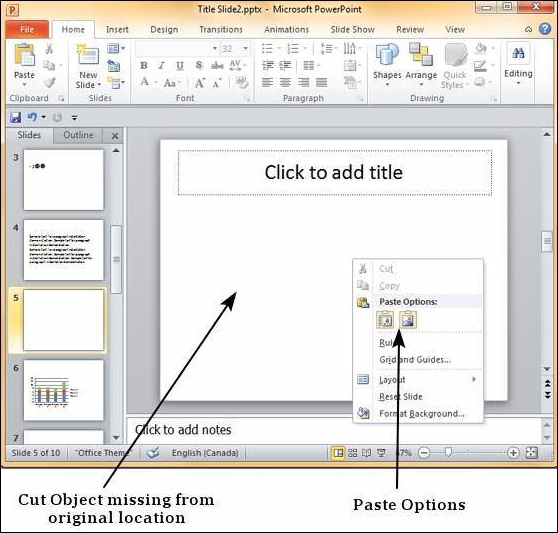
This option allows you to cut content from the slide - this means the original content is being moved to a different location hence the content will be deleted from its original location when you use this option. To cut a content, you need to select it and press "Ctrl + X" or right-click on the selected content and select Cut.

Microsoft PowerPoint 2010

Copy Option

This option allows you to copy content from one location to another; hence the original content is retained it its place while the duplicate content can be pasted. To copy a portion of content, you need to select it and press "Ctrl + C" or right-click on the selected content and select Copy.

Paste Option

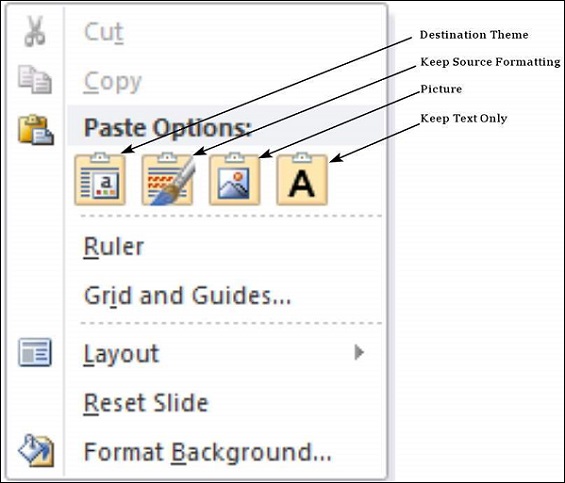
This option allows you to paste the cut or copied content at the desired location. There are multiple paste options for you to choose from. These options are indicated by different icons when you right-click at the desired location. Even if you do not remember the icons, you can hover your cursor on top of them for tooltip explanations. The table below describes the paste options in PowerPoint.

Microsoft PowerPoint 2010


S.NoPaste Option & Description
1

Destination Theme

Pasted content adopts the destination theme.

2

Keep Source Formatting

Pasted content retains the source formatting - available for table or Excel content.

3

Picture

Content is pasted as an image - once pasted as an image, the content cannot be modified.

4

Keep Text Only

Pastes just the text - available for table or Excel content.

You can also paste content using "Ctrl + V". In this case, you can make changes to the pasted object by pressing the Ctrl key to get access to the paste options. Note that these options are available only immediately after pasting. If you perform some other action, you will not be able to make changes based on the paste options.

Microsoft PowerPoint 2010

Tuesday, March 28, 2023

Keyboard Shortcuts


Like the other windows based programs, PowerPoint 2010 also offers a wide range of keyboard shortcuts. For the current PowerPoint users, there is a major change in the way these shortcuts are being mapped in the 2010 release compared to some of the older ones. With a whole new range of features being added to PowerPoint, it is evident why there are so many changes to the keyboard shortcuts. We will understand how to read and figure out the shortcuts with ease.

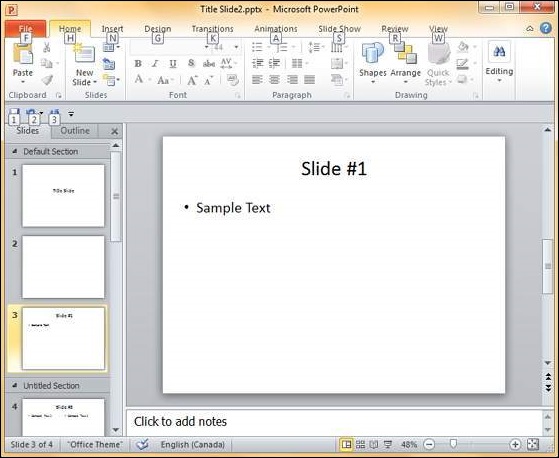
Step 1 − The first step to access the keyboard shortcuts is to press the Altkey on your keyboard. This will display the first level of shortcuts indicated by alphabets or numbers as shown. For example, the shortcut to access the Home ribbon is 'H' and for saving the presentation, the shortcut is '1'.

Microsoft PowerPoint 2010

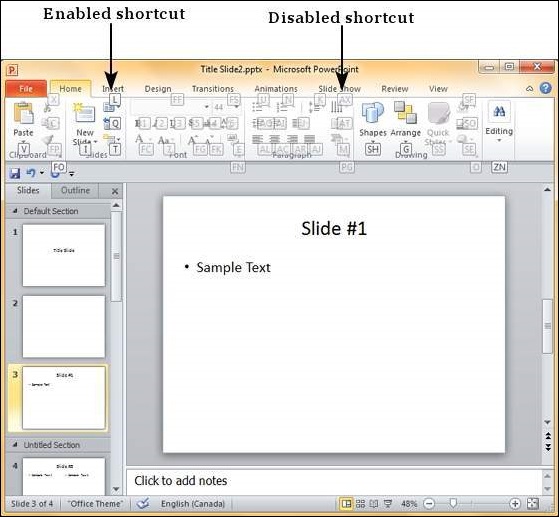
Step 2 − Once you select the first level of shortcut, the second level of shortcuts for respective commands are shown. Notice that some of these shortcuts are disabled or displayed in a lighter shade than others. This is because the disabled shortcuts cannot be used in the current state.

Microsoft PowerPoint 2010

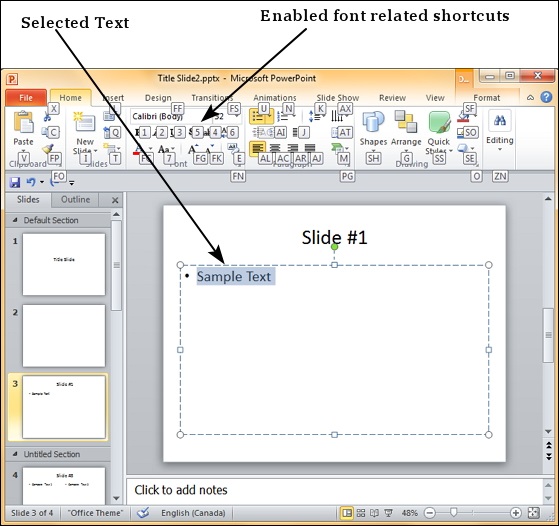
For example, all the font related commands are disabled as no text has been selected. If you execute the same steps after selecting a portion of text, these shortcuts will be enabled too.

Microsoft PowerPoint 2010

In some cases, there are two alphabets associated with a single shortcut; in such cases, you need to key in both of them immediately after another to get the desired effect.

Running Slide Show


Most PowerPoint presentations are created to be run as a slideshow. Given all the advanced features available in PowerPoint 2010, it is no surprise that there are many features related to running the slideshow that have been included in this program too. Most of these features are really to help you create a good slideshow without having to go through the entire presentation over and over again after every minor change. Features related to running the slideshow are grouped under the Slideshow ribbon.

Microsoft PowerPoint 2010

SectionMenu ItemDescription
Start SlideshowFrom BeginningStarts slideshow from beginning
From Current SlideStarts slideshow from the current slide
Broadcast SlideshowAllows users to broadcast the slideshows using Microsoft's PowerPoint Broadcast Service
Custom SlideshowBuilds a custom slideshow by picking the slides you want to run
Set UpSet Up SlideshowHelps set up the slideshow including browser/ full screen display, show options with or without narration/ animation, pen and laser color during the slideshow and the slides to be presented during the show
Hide SlideHelps mark/ unmark the slide as hidden, so it is skipped or shown during the slideshow respectively
Rehearse TimingAllows users to rehearse the timing on each slide and the entire slideshow
Record SlideshowRecords the slideshow including narration and animation
Slideshow CheckboxesHelps set or avoid the use of narrative audio and rehearsed timings during the show. Display media controls in the slideshow view
MonitorsResolutionDefines resolution in slideshow view
Show Presentation onPicks the monitor to display the presentation one - in case of multiple monitors
Use Presenter ViewRun presentation in Presenter view rather than just slideshow view

AntiVirus

Antivirus software is designed to find known viruses and oftentimes other malware such as Ransomware, Trojan Horses, worms, spyw...