Monday, May 29, 2023

Broadcast Slide Show


PowerPoint 2010 offers users to broadcast their presentations on the internet to worldwide audience. Microsoft offers the free broadcast Slide Show service; all you need to do is share the link with your audience and they can watch the presentation from anywhere. There is no special setup or charges required to do this; all you need is a Windows Live account.

Given below are the steps to broadcast your presentation.

Step 1 − Go to the Backstage view under the File tab.

Step 2 − Click on Save & Send, select Broadcast Slide Show option and click on Broadcast Slide Show button.

Microsoft PowerPoint 2010

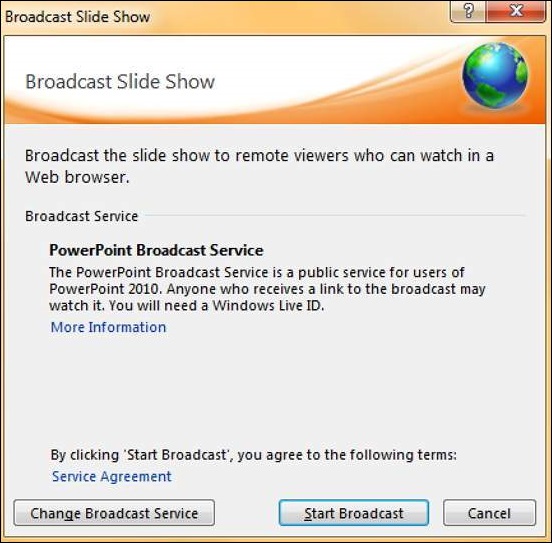
Step 3 − In the Broadcast Slide Show dialog, click on Start Broadcast.

Microsoft PowerPoint 2010

Step 4 − Log on to your Windows Live account in the login dialog.

Step 5 − Once the login is successful, PowerPoint will prepare the presentation for broadcast.

Microsoft PowerPoint 2010

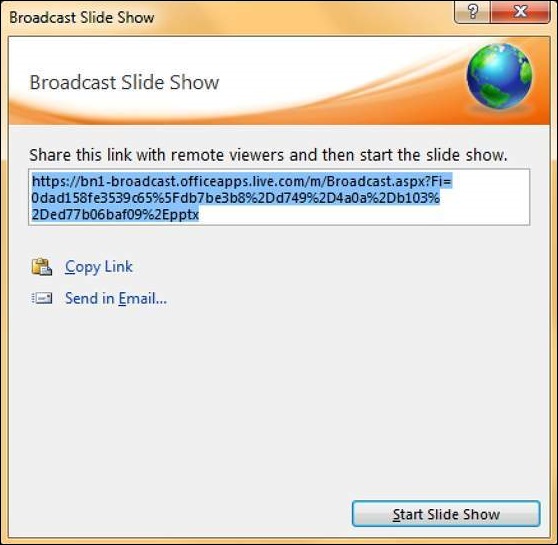
Step 6 − PowerPoint will provide the broadcast service link which you can share with your audience. If you are not using Outlook service, click on "Copy Link" to paste the link in your emails. If you are using Microsoft Outlook service, click on "Send in Email" and list the names of your audience.

Step 7 − Click on Start Slideshow to begin the presentation.

Microsoft PowerPoint 2010

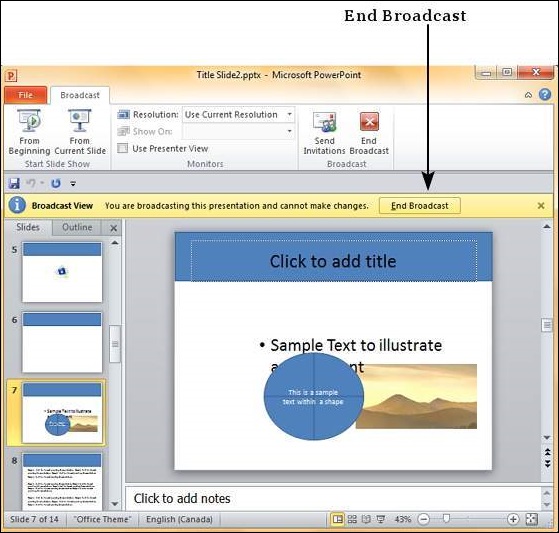
Step 8 − When you are done, you can click on the End Broadcast to stop the online presentation.

Microsoft PowerPoint 2010

Friday, May 26, 2023

Printing Presentation


It is sometimes necessary that you share your slides with your audience in printed format before you begin presenting them so they can take notes. There are other times when you want to give your audience handouts with additional notes.

To print slides, you must go to the Backstage view under the File tab and click on the Print menu.

Microsoft PowerPoint 2010

The following table describes the various printing options available in PowerPoint.

Main SettingsOptionsDescription
Printing SlidesPrint All SlidesPrints all the slides in the presentation.
Print SelectionPrints just the selected objects.
Print Current SlidePrints just the selected slide.
Custom RangeDefines the slides you want printed.
SlidesThis is same as the Custom Range.
Print LayoutFull Page SlidesOne slide per page.
Notes PageSlide and notes for every slide printed one below another - one slide per page.
OutlinePrint Slide outline.
HandoutsPrints 1 or 2 or 3 or 4 or 6 or 9 slides per page - aligned vertically or horizontally. When you print handouts with 3 slides, you get the slide and the notes printed next to each other.
CollationCollating OptionsPrints slides in sequence or prints multiple copies of each slide one after another.
Printing ColorColorSelects color, greyscale or black & white printing options. Although you can select any color settings, the output will depend on the kind of printer you use. A non-color printer cannot print color slides.

Thursday, May 25, 2023

Create Image File


Among the many file types that PowerPoint supports are a set of extensions for image files. The image file extensions supported by PowerPoint include JPEG (.jpg), GIF (.gif), TIFF (.tiff) and Bitmap (.bmp).

Given below are the steps to save a presentation as an image file.

Step 1 − Go to the Backstage view under the File tab.

Microsoft PowerPoint 2010

Step 2 − Click on Save As to open the Save As dialog.

Step 3 − Select one of the image file types from the list of supported file types.

Microsoft PowerPoint 2010

Step 4 − Add a proper name to the file and click Save.

Microsoft PowerPoint 2010

Step 5 − Microsoft PowerPoint dialog will pop up asking if you need just the selected slide or the entire presentation, make your selection.

Microsoft PowerPoint 2010

The respective image file is created in the specified location.

Microsoft PowerPoint 2010

If you selected a single image, the image file is created at the specified location. If you selected entire presentation, then PowerPoint will create a folder with same name as the presentation file at the specified location. Every slide in the presentation will be converted into individual image files and stored under this folder.

Wednesday, May 24, 2023

Create a Video File


PowerPoint allows presentations to be saved as video files that can be posted on video sharing platform like YouTube or just played on any other media.

Given below are the steps to save a presentation as a video file.

Step 1 − Go to the Backstage view under the File tab.

Microsoft PowerPoint 2010

Step 2 − Click on Save As to open the Save As dialog.

Step 3 − Select the file type as .wmv from the list of supported file types.

Microsoft PowerPoint 2010

Step 4 − Add a proper name to the file and click Save.

Microsoft PowerPoint 2010

Step 5 − The video creation is not an instant process like other file types as PowerPoint needs to create the video file. You can track the progress of video creation at the bottom of your presentation window.

Microsoft PowerPoint 2010

Step 6 − Once the creation is complete, the video file is created in the specified location.

Microsoft PowerPoint 2010

Tuesday, May 23, 2023

Create a PDF File


Although PowerPoint is used to create presentations, it supports various file types when it comes to saving the content. With a host of operating systems and Office versions available in the market, using a pdf file type can be a great way of ensuring everyone sees the same slides.

Given below are the steps to save a presentation as a pdf file.

Step 1 − Go to the Backstage view under the File tab.

Microsoft PowerPoint 2010

Step 2 − Click on Save As to open the Save As dialog.

Step 3 − Select the file type as .pdf from the list of supported file types.

Microsoft PowerPoint 2010

Step 4 − Add a proper name to the file and click Save.

Microsoft PowerPoint 2010

Step 5 − The .pdf file is created in the specified location.

Microsoft PowerPoint 2010

Monday, May 22, 2023

Add & Preview Transitions


PowerPoint supports slide transition feature which allows you to specify how should the slides transition during the slide show.

Given below are the steps to add and preview slide transitions.

Step 1 − Select the slide to which you want to apply the transition.

Step 2 − Go to the Transition Scheme under the Transitions ribbon.

Microsoft PowerPoint 2010

Step 3 − Select one of the transition schemes from the list available. PowerPoint will instantly show you a preview of the scheme. If you are not satisfied, you can pick an alternate scheme. The last selected scheme will apply to the slide.

Microsoft PowerPoint 2010

Step 4 − You can change the effects on the selected transition scheme from the Effect Options menu. Every scheme has a unique set of effect options.

Microsoft PowerPoint 2010

Step 5 − You can also modify the transition timing settings from the Timingsection.

Step 6 − To preview the slide transition, click on Preview.

Microsoft PowerPoint 2010

Friday, May 19, 2023

Add & Preview Animations


PowerPoint offers animation support which can be used effectively to add some motion in a monotonous presentation and make it more interesting. Animation can be applied to any object on the slide and the motions can the automated, timed or trigger.

The following steps will help you add and preview animations in the slide.

Step 1 − Go to the Animation ribbon and click on the Animation Pane to display the animation sidebar.

Microsoft PowerPoint 2010

Step 2 − Select one of the objects in the slide and click on the Add Animation menu option.

Microsoft PowerPoint 2010

Step 3 − Choose from one of the Animation options.

Microsoft PowerPoint 2010

  • Entrance will cause the object to appear in the screen.

  • Emphasis will cause the object to emphasis without appearing or leaving the screen.

  • Exit will cause the object to disappear from the screen.

Step 4 − Once you add the animation for an object, it will show up in the Animation pane.

Microsoft PowerPoint 2010

Step 5 − By default, all the animations are initiated by a click, but you can change this. To change the trigger, right-click on the animation object on the pane and choose an alternate trigger.

Microsoft PowerPoint 2010

  • Start On Click will cause the animation to start when you click the mouse.

  • Start With Previous will cause the animation to begin with the previous animation; if this is the first object, it will begin as soon as you reach the slide during the slide show.

  • Start After Previous will cause the animation to begin after the previous animation ends.

Step 6 − From the timing section, you can also manipulate the animation timings.

Step 7 − To preview the animation settings, just click Play on the animation pane.

Microsoft PowerPoint 2010

Data Link Layer

In the OSI model, the data link layer is a 4 th  layer from the top and 2 nd  layer from the bottom. The communication channel t...