Monday, June 5, 2023

Explore Window in Excel 2010


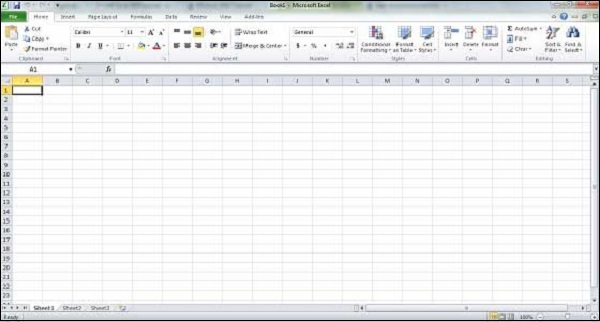
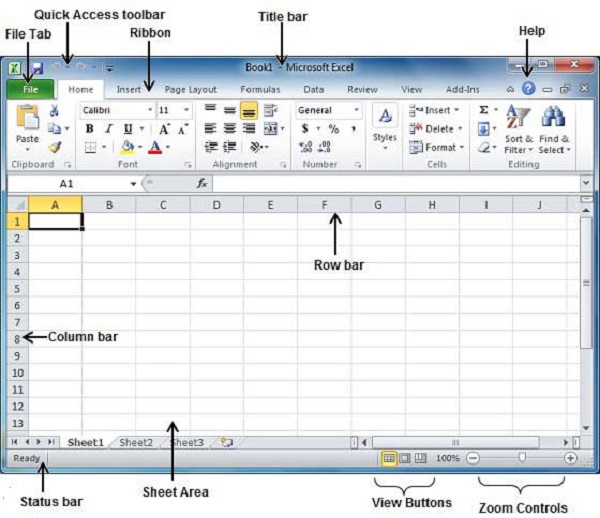
The following basic window appears when you start the excel application. Let us now understand the various important parts of this window.
Explore Excel Window

File Tab

The File tab replaces the Office button from Excel 2007. You can click it to check the Backstage view, where you come when you need to open or save files, create new sheets, print a sheet, and do other file-related operations.

Quick Access Toolbar

You will find this toolbar just above the File tab and its purpose is to provide a convenient resting place for the Excel's most frequently used commands. You can customize this toolbar based on your comfort.

Ribbon

Excel Ribbon

Ribbon contains commands organized in three components −

  • Tabs − They appear across the top of the Ribbon and contain groups of related commands. Home, Insert, Page Layout are the examples of ribbon tabs.

  • Groups − They organize related commands; each group name appears below the group on the Ribbon. For example, group of commands related to fonts or group of commands related to alignment etc.

  • Commands − Commands appear within each group as mentioned above.

Title Bar

This lies in the middle and at the top of the window. Title bar shows the program and the sheet titles.

Help

The Help Icon can be used to get excel related help anytime you like. This provides nice tutorial on various subjects related to excel.

Zoom Control

Zoom control lets you zoom in for a closer look at your text. The zoom control consists of a slider that you can slide left or right to zoom in or out. The + buttons can be clicked to increase or decrease the zoom factor.

View Buttons

The group of three buttons located to the left of the Zoom control, near the bottom of the screen, lets you switch among excel's various sheet views.

  • Normal Layout view − This displays the page in normal view.

  • Page Layout view − This displays pages exactly as they will appear when printed. This gives a full screen look of the document.

  • Page Break view − This shows a preview of where pages will break when printed.

Sheet Area

The area where you enter data. The flashing vertical bar is called the insertion point and it represents the location where text will appear when you type.

Row Bar

Rows are numbered from 1 onwards and keeps on increasing as you keep entering data. Maximum limit is 1,048,576 rows.

Column Bar

Columns are numbered from A onwards and keeps on increasing as you keep entering data. After Z, it will start the series of AA, AB and so on. Maximum limit is 16,384 columns.

Status Bar

This displays the sheet information as well as the insertion point location. From left to right, this bar can contain the total number of pages and words in the document, language etc.

You can configure the status bar by right-clicking anywhere on it and by selecting or deselecting options from the provided list.

Dialog Box Launcher

This appears as a very small arrow in the lower-right corner of many groups on the Ribbon. Clicking this button opens a dialog box or task pane that provides more options about the group.
 

Friday, June 2, 2023

Getting Started with Excel 2010


This chapter teaches you how to start an excel 2010 application in simple steps. Assuming you have Microsoft Office 2010 installed in your PC, start the excel application following the below mentioned steps in your PC.

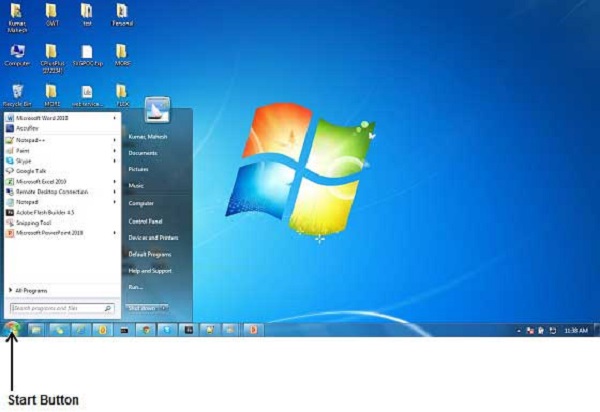
Step 1 − Click on the Start button.

Windows Start Button

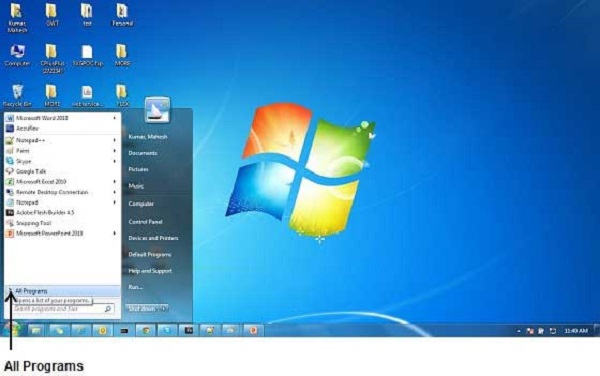
Step 2 − Click on All Programs option from the menu.

Windows All Programs

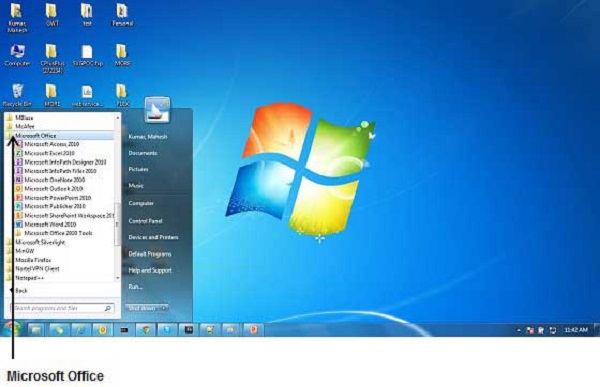
Step 3 − Search for Microsoft Office from the sub menu and click it.

Microsoft Office 2010

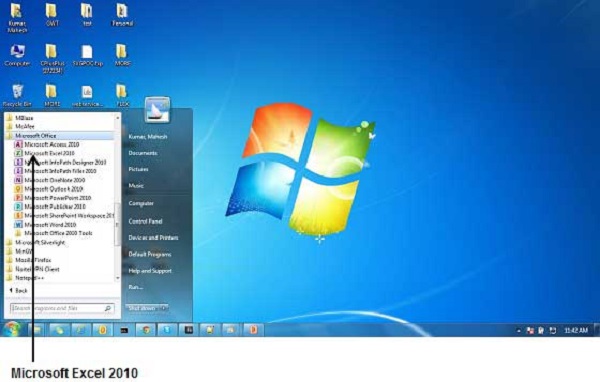
Step 4 − Search for Microsoft Excel 2010 from the submenu and click it.

Microsoft Excel 2010

This will launch the Microsoft Excel 2010 application and you will see the following excel window.

Excel Window

Thursday, June 1, 2023

Email Slide Show


PowerPoint allows users to share the presentation as an email attachment too. Although you can attach the presentation from outside the program, the ability to send the emails directly from PowerPoint is quite convenient; this is because you need not leave the PowerPoint program to send the email.

Given below are the steps to send an email from PowerPoint.

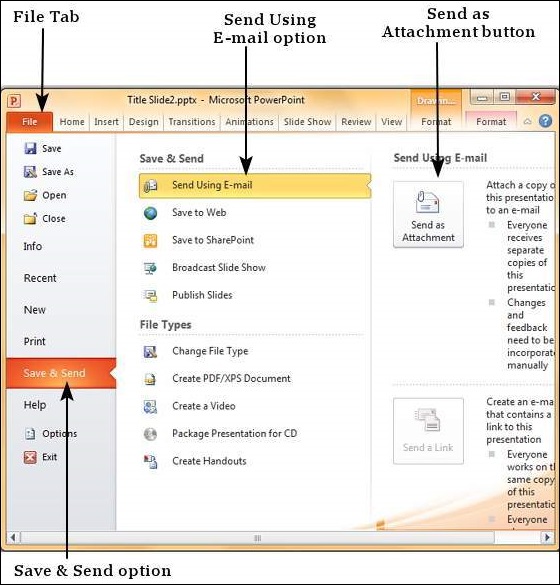
Step 1 − Go to the Backstage view under the File tab.

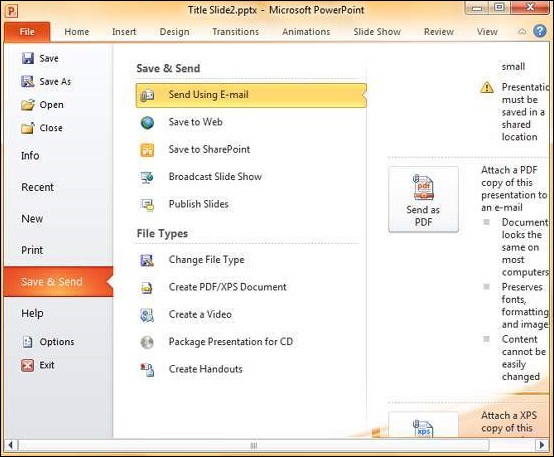
Step 2 − Click on Save & Send, select Send Using E-mail option and click on Send as Attachment button.

Microsoft PowerPoint 2010

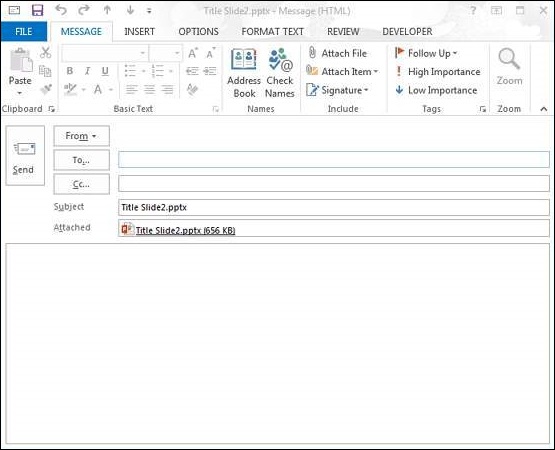
Step 3 − This launches the Outlook Send Email window with the presentation added as attachment. You can add the emails of recipients and send the email.

Microsoft PowerPoint 2010

Step 4 − Instead of "Send as Attachment" you select "Send as PDF", you will get a pdf attachment instead of a .pptx attachment.

Microsoft PowerPoint 2010

Wednesday, May 31, 2023

Setting Document Password


Sometimes it is important to protect the presentation and ensure unauthorized audience does not get to view the slides. PowerPoint offers users the ability to protect the presentations.

Given below are the steps to password protect the presentation

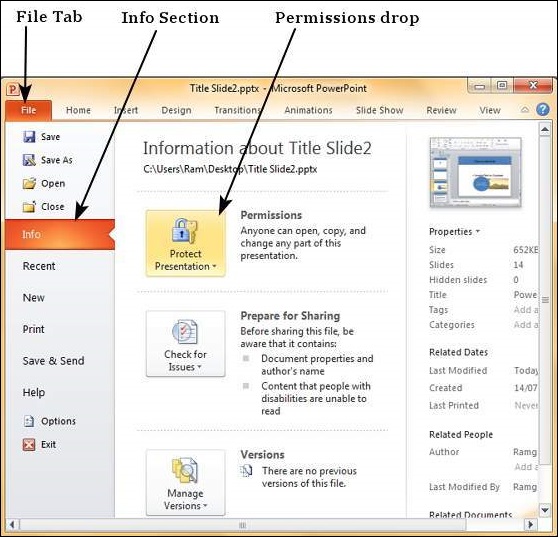
Step 1 − Go to the Backstage view under the File tab.

Step 2 − On the Info section, click on the Permissions dropdown.

Microsoft PowerPoint 2010

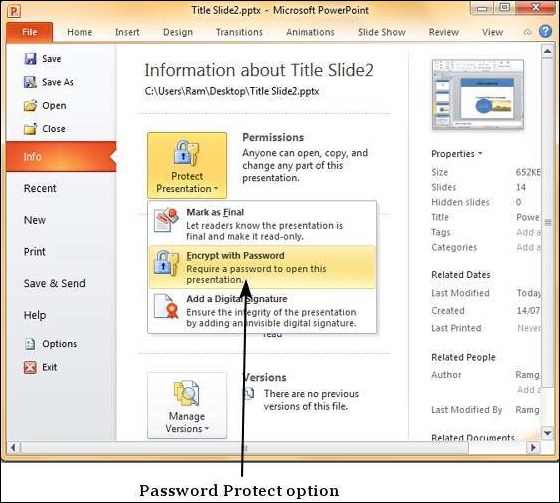
Step 3 − Select "Encrypt with Password" to enable password protection.

Microsoft PowerPoint 2010

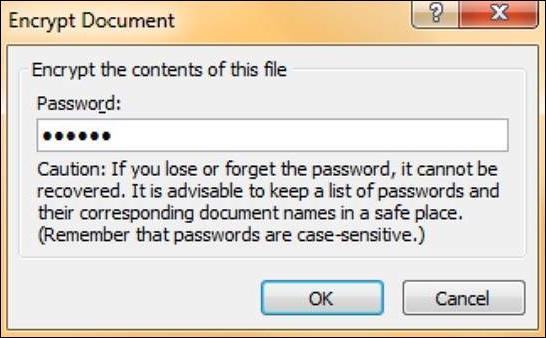
Step 4 − Enter the password in the Encrypt Document dialog.

Microsoft PowerPoint 2010

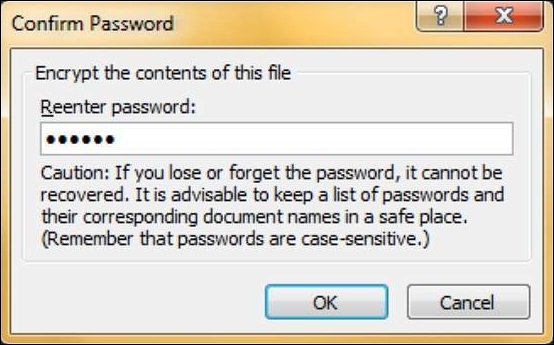
Step 5 − Re-enter the password in the Confirm Password dialog.

Microsoft PowerPoint 2010

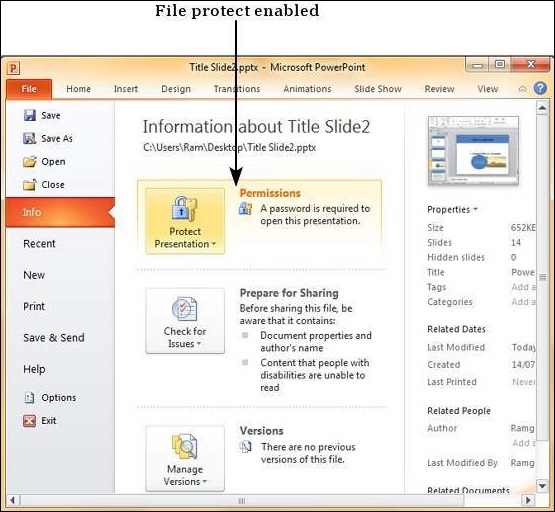
Step 6 − Your presentation is now password protected.

Microsoft PowerPoint 2010

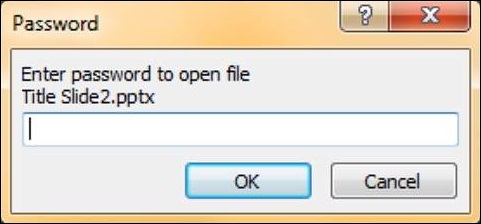
Step 7 − Readers will now have to enter the password in the Passworddialog to open the file.

Microsoft PowerPoint 2010

Step 8 − To unprotect the file, follow the steps up to Step 3 and delete the password in the Encrypt Document dialog.

Tuesday, May 30, 2023

Packaging Presentation


Certain presentations are better suited for distribution as a CD to audience. In such cases, you can create a CD packaging which can be burned into a CD and distributed.

Given below are the steps to package your presentation for CD.

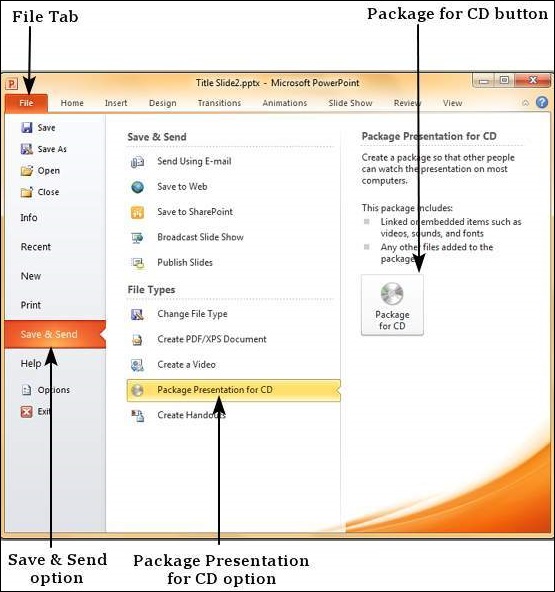
Step 1 − Go to the Backstage view under the File tab.

Step 2 − Click on Save & Send, select Package Presentation for CDoption and click on Package for CD button.

Microsoft PowerPoint 2010

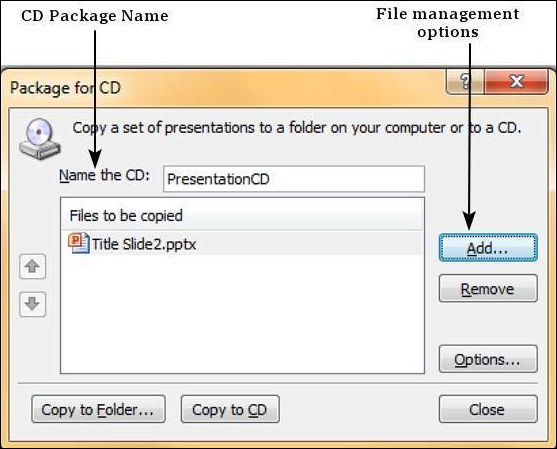
Step 3 − On the Package for CD dialog, select the package or CD name. Use the file management options of Add and Remove to add or remove more files to the package.

Microsoft PowerPoint 2010

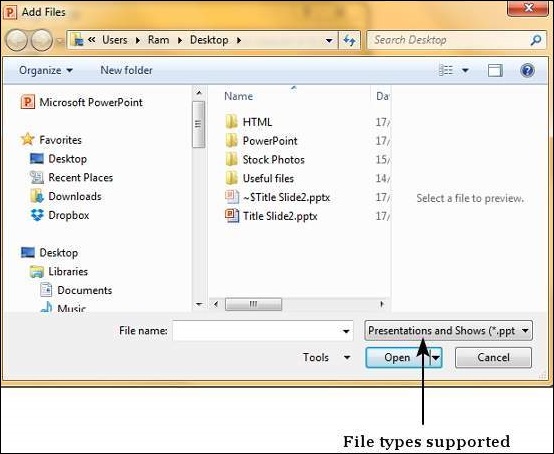
Step 4 − Use the Add Files to add files to the package. The default file type filter is set to presentations and shows, but you can change it to search any file type.

Microsoft PowerPoint 2010

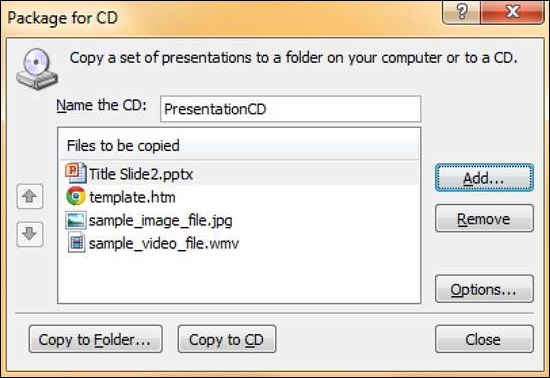
Step 5 − Once you have all the files ready for the package, click on "Copy to Folder" or "Copy to CD" and follow the steps to create the final package.

Microsoft PowerPoint 2010

Monday, May 29, 2023

Broadcast Slide Show


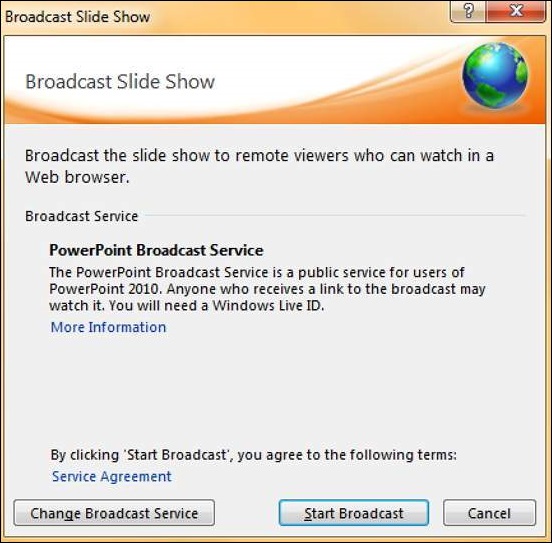
PowerPoint 2010 offers users to broadcast their presentations on the internet to worldwide audience. Microsoft offers the free broadcast Slide Show service; all you need to do is share the link with your audience and they can watch the presentation from anywhere. There is no special setup or charges required to do this; all you need is a Windows Live account.

Given below are the steps to broadcast your presentation.

Step 1 − Go to the Backstage view under the File tab.

Step 2 − Click on Save & Send, select Broadcast Slide Show option and click on Broadcast Slide Show button.

Microsoft PowerPoint 2010

Step 3 − In the Broadcast Slide Show dialog, click on Start Broadcast.

Microsoft PowerPoint 2010

Step 4 − Log on to your Windows Live account in the login dialog.

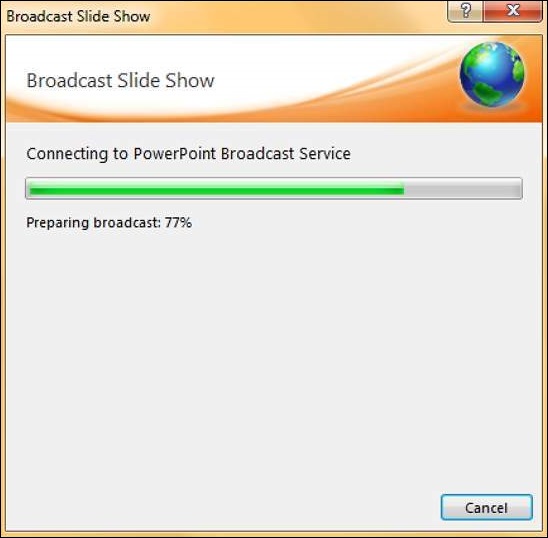
Step 5 − Once the login is successful, PowerPoint will prepare the presentation for broadcast.

Microsoft PowerPoint 2010

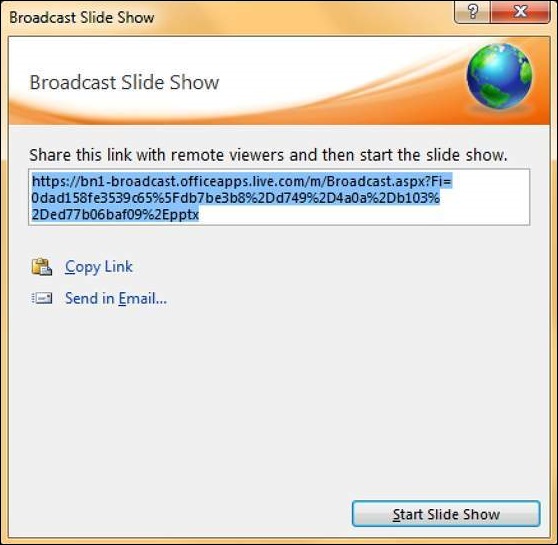
Step 6 − PowerPoint will provide the broadcast service link which you can share with your audience. If you are not using Outlook service, click on "Copy Link" to paste the link in your emails. If you are using Microsoft Outlook service, click on "Send in Email" and list the names of your audience.

Step 7 − Click on Start Slideshow to begin the presentation.

Microsoft PowerPoint 2010

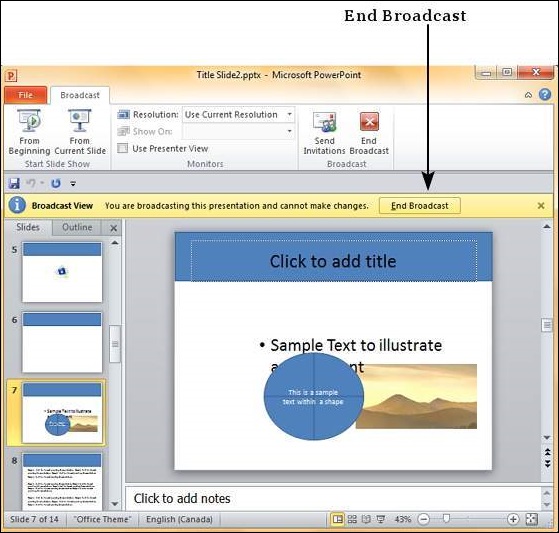
Step 8 − When you are done, you can click on the End Broadcast to stop the online presentation.

Microsoft PowerPoint 2010

Friday, May 26, 2023

Printing Presentation


It is sometimes necessary that you share your slides with your audience in printed format before you begin presenting them so they can take notes. There are other times when you want to give your audience handouts with additional notes.

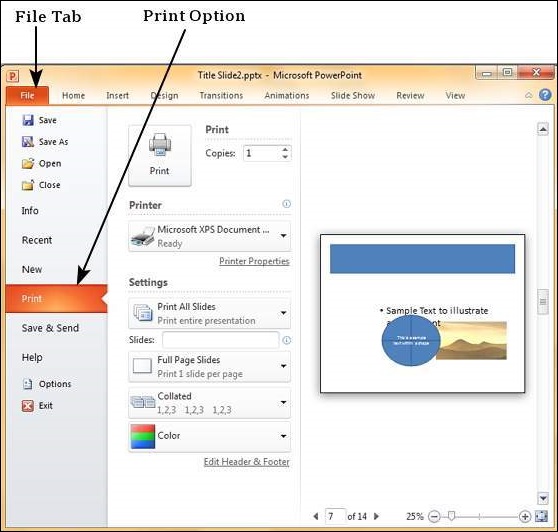
To print slides, you must go to the Backstage view under the File tab and click on the Print menu.

Microsoft PowerPoint 2010

The following table describes the various printing options available in PowerPoint.

Main SettingsOptionsDescription
Printing SlidesPrint All SlidesPrints all the slides in the presentation.
Print SelectionPrints just the selected objects.
Print Current SlidePrints just the selected slide.
Custom RangeDefines the slides you want printed.
SlidesThis is same as the Custom Range.
Print LayoutFull Page SlidesOne slide per page.
Notes PageSlide and notes for every slide printed one below another - one slide per page.
OutlinePrint Slide outline.
HandoutsPrints 1 or 2 or 3 or 4 or 6 or 9 slides per page - aligned vertically or horizontally. When you print handouts with 3 slides, you get the slide and the notes printed next to each other.
CollationCollating OptionsPrints slides in sequence or prints multiple copies of each slide one after another.
Printing ColorColorSelects color, greyscale or black & white printing options. Although you can select any color settings, the output will depend on the kind of printer you use. A non-color printer cannot print color slides.

AntiVirus

Antivirus software is designed to find known viruses and oftentimes other malware such as Ransomware, Trojan Horses, worms, spyw...